10 Free Fashion WordPress Themes 2017

It’s all about fashion. Designer, online retailer, bricks and mortar retailer, model, blogger, photographer, editor…. you name it there is a place for somebody in the fashion world. So this week’s list is about the creative. There are some themes for ecommerce if you own a store, portfolio driven templates for photographers, designers or models. And magazine layout for bloggers and editors. Showcased this week is 0 Free Fashion WordPress Themes. A template design for every job in fashion.

Read More

10 Free Best WordPress Themes 2018

So you want to build a website? You’ve landed in the right place. WordPress Themes is the CMS platform you should consider using.  Elegant, responsive themes with easy to add blogs and customizeable features. This sums up the attributes for this weeks list. 

Read More

Integral Pro v1.2.5 Released

Today we released an update to our popular one-page theme – Integral Pro.

Version 1.2.5 fixes a couple issues and includes several new features.

See the list of changes below;

CHANGELOG

# v1.2.5 – 09/12/2016

  • Added default header for homepage when One-page Layout is not configured
  • Added ability to toggle buttons on the default homepage header
  • Added customizer.php for settings for the default homepage header
  • Added seperate files for functions in /inc/
  • Added setting to toggle header and footer
  • Added img-responsive class to logo image
  • Added styles to limit width of logo on mobile devices
  • Added Youtube icon to contact section
  • Updated hero.php
  • Updated styles.css
  • Updated functions.php
  • Updated footer.php
  • Updated archive.php
  • Updated single projects widget to not display grey description section when no data is entered
  • Updated the contact section file and added custom class for margin
  • Fixed big and small title size on mobile devices
  • Fixed spelling errors in theme description and theme welcome
  • Fixed smooth scroll effect
  • Fixed issue with text alignment in master slider content section
  • Fixed issue with content appearing in contact section when none was selected

If you have already purchased Integral Pro; log into your Customer Dashboard to download the theme.

To update your theme; follow these instructions.

http://support.themely.com/knowledgebase/how-to-update-your-theme/

If you are using the free version – Integral Lite – upgrade today and save 10% with coupon code THEMELY10.

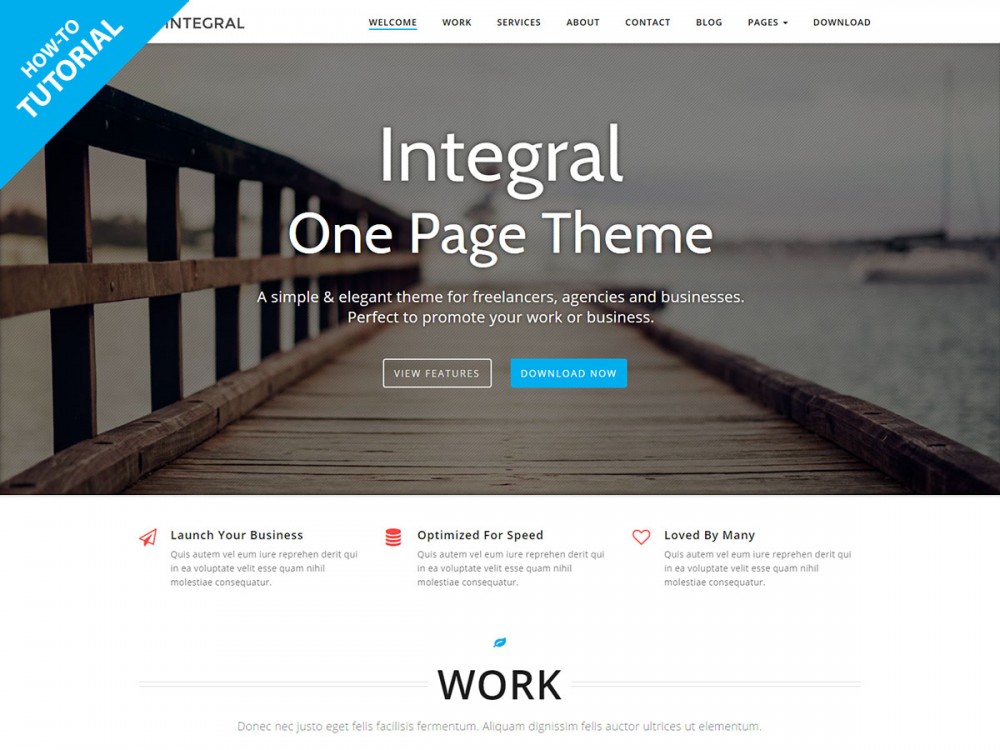
Tutorial: How to build a One Page WordPress Site with Integral

We’ve written up a tutorial to show you how to build an elegant and professional one-page website in less than 1 hour with our popular Integral theme.

This tutorial is based off a video we created a little while back which you can view here or at the bottom of this tutorial.

If you don’t have a copy of Integral, you can download it here https://www.themely.com/themes/integral/

If you’ve downloaded the theme and you’re ready, lets get started.

Step 1: Install WordPress

If you have not already installed WordPress on your hosting account, log into cPanel on your account, enter the necessary credentials and install WordPress.

You will be redirected to a confirmation page containing your new credentials and a link to the new add-on.

Step 2: Log into WordPress 

Log into your new WordPress account admin panel using the previously entered credentials on installation.

Step 3: Change Theme to Integral

From the dashboard, click “change your theme completely” or choose “Appearance” then “Themes” from the side bar menu.

This page displays the themes you have currently installed in your application. To add another theme, Integral, simply click the “Add New” button.

Step 4: Upload and Activate Integral Theme

  1. Upload and Installation: After choosing “Add New,” select the “Upload” button in the same location to upload the new theme.  Upload the zip file of the Integral theme and click “Install Now.”  This will then direct to a confirmation page where the option to Activate the theme becomes available.
  2. Activation: Click “Activate” and you will be redirected to the theme page where Integral is now activated on the dashboard.

Step 5: Install and Activate the Recommended Plugins

After theme Activation, WordPress will redirect to the Integral theme dashboard.  You will find recommended plugins for the theme under “Step 1 – Install Plugins”.

Install all plugins by choosing “Install Plugins Here” link that will redirect to the list of recommended plugins.  Select all by clicking the empty checkbox in the header, under “Install”, and click “Apply.”  The plugins will then be installed and activated, and you will be redirected to to a confirmation page.

Step 6: Configure the Homepage “One-Page Layout”

Return to the Integral theme dashboard by choosing “Appearance” on the sidebar menu, and clicking “Getting Started with Integral Theme.”  Refer to the instructions under “Step 2 – Configure Homepage” Layout.”

  1. Start by creating (or editing) a page under “Pages” then click “Add New”
  2. Give it a title and assign it the One-page Template under the Page Attributes section on the right-hand menu below Publish options.
  3. Go to “Settings” then “Reading” on the main side bar menu on the left.
  4. Set Front page displays to “A static page”. Then from the drop-down, select the page you just assigned the One-page Template as “Front page” and then choose another page as “Posts page” to serve your blog posts.

Step 7:  Configure the Top Menu

On the main menu, choose “Appearance” then “Menus” to configure the top menu.  Arrange and name menu items as preferred.  You can add or remove topics.

Right click on the website name on the top left corner to open a new tab and view the front-end of the website. This is useful so when you make changes in the back-end you can re-fresh the page to see them in real time.

Step 8:  Configure and Customize Theme Settings

Go to the Integral Options panel on the side menu. This is where you can configure theme settings and customize certain content.

Step 9:  Import Content to the Live Demo

Manually importing demo content from the live demo site: http://demo.themely.com/integral/ helps you see how to add your own content.  Start by configuring the top menu for each homepage section by choosing “Menus” under “Appearance” on the side bar.  Find Custom Links, and duplicate the demo headers by entering “#” plus their title in the “URL” section, and the title in “Link Text” then click “Add to Menu.”  You can preview your changes any time.

Step 10: Create Widgets for Features Section

Under the same “Appearance” section, choose “Widgets” and find the “Homepage Features Section.”  Drag the “Integral – Feature Widget” to that section and it will open up a menu.  Enter the required information as seen on the demo site.  Inspect the icon element to find the class description.  Upload the image and description and save.  Repeat steps to add more Feature Widgets.

Repeat this step to add the corresponding widgets to each section.  Add as many or as few widgets as needed.  You can preview your changes any time.

Step 11: Add Content

Now that you understand how to add the features and content to this theme, add original content to your sections.  Find “Pages” on the left hand menu, and choose “Add New.”  Fill in a title and body.  Depending on where you want the content, visit “Integral Options” then choose a section, like “Work Section” to place your content in that section, under the “Content” drop-down.  You also have the option to disable sections as needed.

6 Ways to Speed up Your WordPress site

Speed matters when it comes to websites. As average internet connection speeds increase around the world, people are becoming less and less tolerant of slow load times. At the same time, Google is pretty up-front about the fact that it rewards fast sites with better page rankings.

Delivering a beautiful and easy-to-use website remains the primary goal of most WP developers. However, good design doesn’t just rely on aesthetics, and sometimes less really is more. A lightning-fast, streamlined site is often more effective at engaging customers than one built on high-quality images and fancy animations.

Why Page Load Time Matters

Even incremental improvements in your website’s load time can have a large effect on traffic. Back in 2009, Akamai found that users became impatient when they had to wait more than 2 seconds for a page to load, and it seems that we’ve only got more impatient since then. Today, 30% of users say they expect sites to load in under one second.

Load times are also important for mobile sites. Back in 2015, Google announced that the availability of mobile sites would be one of the factors in determining page ranking. And if anything, we are more impatient when it comes to looking at websites on our phones, with Intuit finding that every one second decrease in loading times increased conversions by more than 1%.

These are not just abstract statistics: they have real effects on the success of your website. Research by Kissmetric has found that a one second delay in page load times can lead to an 11% drop in pageviews, and a 16% drop in customer satisfaction. If, as MotoCMS points out, your e-commerce site is making $100,000 a day, such a delay could potentially cost you $2.4 million every year.

If you haven’t thought about page load times, the first gains are easy to make, and you should see big results. If you’ve already optimized your site, it might be difficult to shave even a few milliseconds from your speed, but it’s definitely worth it. Even speeding up your site from a 3 second load time to 2 seconds can increase conversions by 1%:

For every 1s of performance gain

How To Speed Up Your Website

Thankfully, there are some pretty easy ways to speed up your site, ranging from looking at the providers you use to optimizing particularly “heavy” elements of your design. Let’s take a look at a few of them.

1. Test Your Page Speed

The first and most important step in increasing page speed is to test it. Even if you think your page is running pretty fast already, it’s worth testing from time to time, because even an individual element of your page can really effect loading times.

There are two tools for measuring pagespeed that I would recommend. The first is PageSpeed Insights. It measures the performance of a page on both desktop and mobile devices, and gives you a prioritized list of what you should think about changing.

test your page speed

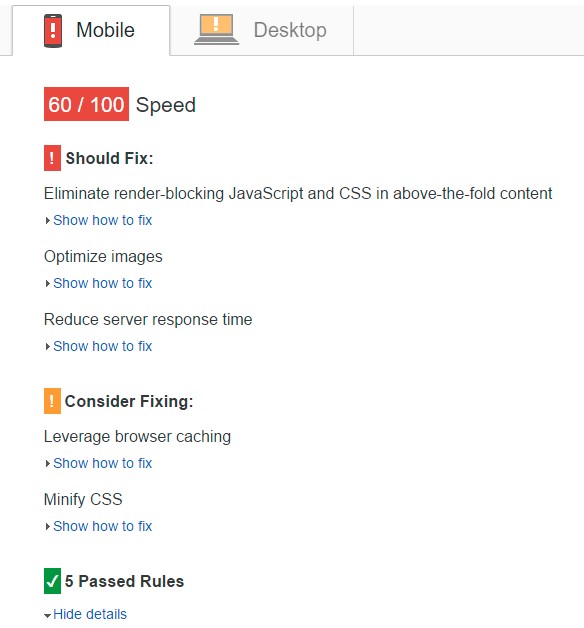
The second tool is Google’s PageSpeed Insights, which uses similar tests, but also gives you tips and guides on how to improve particular components of your site. Like this:

test your page speed mobile

I would recommend using both these tools to benchmark your site’s performance regularly. In particular, if you are in the process of optimizing your page’s speed, your should check with these tools before and after this process to make sure you have actually made progress.

2. Use A CDN

A content delivery network (CDN) is often sold as a miracle cure for slow-loading websites. They aren’t quite that, but for certain sites they can be very useful. They work by pulling the content from your website down to a series of local servers, and allowing users to access your site from the closest server.

Robust content delivery network

This is particularly useful for certain sites. If your site is accessed from all over the world, and is image-heave, a CDN will improve loading times, especially for visitors in countries that are less well connected. On the other hand, if you are already running a minimal site, the speed gains will not be that impressive. Even people hosting their websites in areas like Australia which generally suffer from weaker Internet connections should consider using a quality CDN network as their primary host.

There are plenty of CDNs available, ranging from budget solutions to fully-featured, customizable systems. SiteLock TrueSpeed, MaxCDN, and Cloudflare are good places to start.

3. Minify JavaScript, CSS, and HTML

The tools I mentioned above should give you a pretty good idea if any of these elements are slowing your page down. Even a few years ago, when writing HTML and CSS directly was more common, most expert developers minified their code as a matter of course. Nowadays, most of us do our designing through visual editors, some hardly look at the code they are generating, and the art of writing efficient code has been somewhat lost.

This is a shame, because even line breaks, indentations, and extra spaces in your code can add a significant latency to your site. JS is particularly guilty in this regard, and I recommend looking at any JS file that is larger than 4096 bytes as a candidate for minification.

There are essentially two approaches to minimizing code, depending on your level of expertise. If you are comfortable writing code directly, and have the time, a few hours spent optimizing your code can bring significant improvements, even if it is only deleting the white space from you HTML.

The other approach is to use automated code compactors. JavaScript Compressor, CSS Compressor, and HTML Minifier are good places to start. While this approach is faster, be warned that sometimes these automated tools can leave your code pretty unreadable, and therefore hard to modify afterwards.

4. Compress and Optimize Images

I’m still amazed by how many otherwise professional-looking websites use high-res images that take an age to load. I think part of the problem here is that a lot of developing is done in countries with fast internet connections, where huge images load quickly, and developers forget that not everyone around the world has access to a fast connection.

WordPress claims to have solved this problem, but it hasn’t. You’ve probably noticed that you can upload images at full size, and that WP will then scale them for display. This is great, but the problem is that it forces web browsers to perform multiple commands, which can slow down your site.

The way around this is simple – use images that are the right size for your page. You can do this manually, using a basic tool like Preview (Mac) or Paint (Windows). Once your images are the correct size, you can go one step further and compress them for optimal performance. Tools like TinyPNG can help with this – you upload your image, and the tool will compress it without affecting the resolution.

Compress and optimize images

If you are using WordPress, you’ve probably noticed

5. Get Better Hosting

Your choice of hosting provider can have a big effect on your page load speed. If you’ve looked at all the areas above, and your page is still too slow, it could be that your host is responsible for this.

While it may seem that every host is equal, they are not. It is true that most of the big providers are comparable in terms of speed and uptime, but be warned that there are also a lot of “budget” web hosts whose performance is … less than good. Take a look at a site that compares hosting speeds to find out how fast your host is.

Be aware, also, that there are many types of web hosting. The type you choose should be suitable for the size and traffic of your site. Shared hosting is a good option for small sites, but if your site grows you should really consider upgrading to a dedicated server. A mid-way option is a VPS, or virtual private server, which allows you a degree of control over your server.

And if you don’t want to go to the hassle of changing host entirely, you should also be aware that most reputable hosts offer several levels of service, and can implement upgrades on your site that will improve loading times.

6. Design Your Site Properly

Ultimately, while the steps above can help you make gradual improvements in your page speed, there is simply no substitute for good page design. While this may sound like an abstract concept, in reality there are some pretty clear rules to designing websites that are both beautiful and fast.

The first is to recall some of the tricks that we all used to use in the 1990s, but that we might have forgotten about. Keep your HTML clean, use CSS sparingly, use one image instead of five, and put your CSS at the top and your JS at the bottom.

The second is to keep it clean. Most of the award-winning sites now are praised primarily for their minimal design. There is a reason for this. Clean websites easier to use, they look better, and they load faster.

So if you’ve done everything above, and still want a faster site, it might be time for a re-design!

10 Free Writer WordPress Themes 2018

Bloggers, writers, authors or anyone else in the business of publishing will enjoy our next post; Free Writers themes pulled from the WordPress database. As the number 1 downloaded content management system (CMS) this platform is easy to set-up and easy to navigate. But, that doesn’t mean all sites are built equal. Fancy design can deceive you; flashy colors, cool layouts and font could distract you into thinking the website was designed well. So how do you know?

Read More

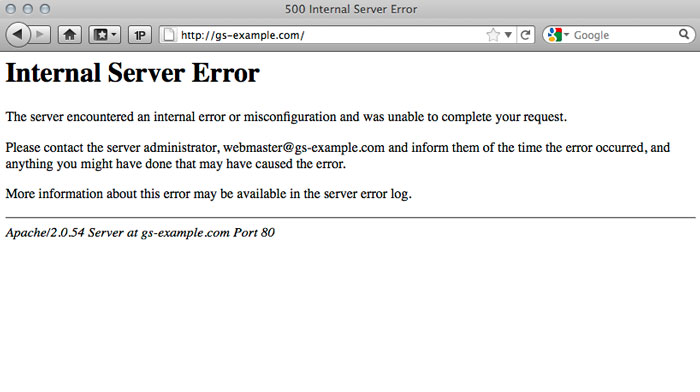
HTTP 500 Integral Server Error

How to fix the HTTP 500 internal server error in WordPress

This error is not specific to WordPress and can happen on any web server. Unfortunately, the error doesn’t specify what the issue could be. In WordPress it is most often caused by plugins or theme functions.

Here are 5 steps to debug this error.

Check the .htacces file

To check to see if the problem is caused by the .htaccess file you need rename it.

The .htaccess file is located in the root directory of your WordPress installation. This is the same directory where the /wp-admin, /wp-includes & /wp-content folders are located.

.htaccess located in WordPress root directory

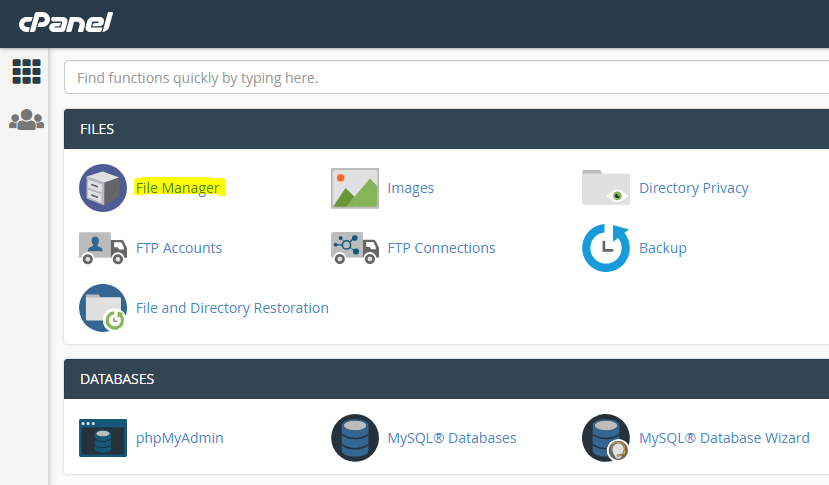
Connect to your server via FTP or the File Manager link in your hosting account panel.

cPanel File Manager

Next, you want to rename the file to something like .htaccess_backup.

Once you’ve renamed the file, visit your website (or refresh the page) to see if the site is working again.

If it is, great! You’ve fixed the problem. However, you need to do one more thing before you’ve completely solved the issue.

In your Admin Dashboard go to Settings > Permalinks and click the SAVE button without making any changes.

This will re-generate the .htaccess file and ensure your readers don’t encounter 404 pages when visiting your site.

If this doesn’t fix the problem, proceed to the next step.

Increase the PHP memory limit

The error can also be caused by a plugin or theme function exhausting your current PHP memory limit.

If this is the case you can increase the PHP memory limit but you’ll still need to deal with the core problem after you’ve got your site running again.

To increase the PHP memory limit you need to edit the wp-config.php file.

You’ll need to edit the file by connecting to your server via FTP or with the File Manager inside your hosting account panel.

The file is located in the root directory of your WordPress installation.

wp-config.php file located in WordPress root directory

Add the following code to the bottom of the file.

define( 'WP_MEMORY_LIMIT', '256M' );

This will tell WordPress to increase the PHP memory limit to 256 MB, which should be more than enough.

Then save your changes and check your site.

If this fixes the problem, great! But you still need to find the root cause of the problem that is exhausting your PHP memory.

As I mentioned before it is most likely a poorly coded plugin or theme function.

I recommend you contact your hosting provider and ask them to check the server logs.

If increasing the memory limit didn’t work, proceed to the next step.

Deactivate all plugins

If the previous 2 steps haven’t worked, the issue could most likely be a plugin, as is often the case.

However, there is no way to tell which plugin it is. So you have to deactivate them all, and then re-activate them all one-by-one to identify the problem plugin.

To disable all your plugins, in your Admin Dashboard, go to Plugins > Installed Plugins and click the checkbox to select all plugins.

Then from the Bulk Options drop-down, select Deactivate and click Apply.

Then check your site. If the problem has disappeared then you know one of the plugins is the culprit.

To identify which one it is, you will need to reactivate them one by one until you discover the problematic plugin.

Once you’ve identified the plugin, report the issue to the plugin author (developer).

Re-install core WordPress files

The 500 internal server error could also be caused by corrupted core WordPress files.

In order to fix that you’ll need to re-install the files.

In the latest version of WordPress, they’ve made this quite easy.

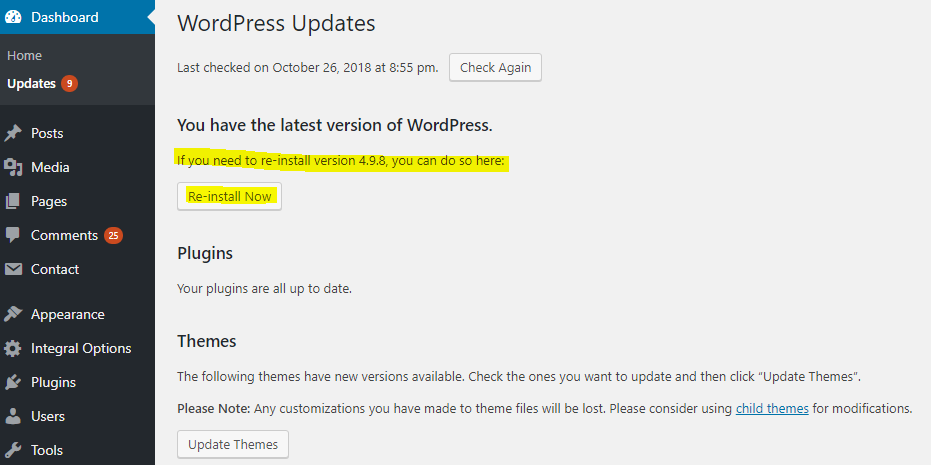
In your Admin Dashboard go to Dashboard > Updates and you’ll see the following.

Re-install WordPress within your dashboard

Click on Re-install Now and let the process run. This will re-write all the core WordPress files instantly.

This process will not overwrite any of your theme, plugin or uploaded files, nor will it affect your database.

If this works then you’ve solved the problem. If not, you’ll need to get help from the experts.

Ask your hosting provider

If all the previous steps have failed to solve the 500 internal server error you should contact your hosting provider.

Ask them to check the server logs and located the root cause of the error.

If this tutorial helped you, please comment below and let us know what you think.

Introducing Integral – A One Page Theme For Creatives

We’re proud to announce the release of our first theme. Meet Integral – a one page theme for creatives, agencies and businesses. It’s strength lies in displaying content on one page in a simple and elegant manner and it’s also super easy to customize. Perfect to promote your work or business.

Check out the demo site and read on for a quick tour.

So, what sets this theme apart?

Unique Features

Integral uses the Redux Framework to manage the theme content; allowing beginners and experts alike to customize the theme without writing any code. Packaged with 20 configurable homepage sections, it allows you to enable/disable and re-order sections with a simple drag and drop feature.

In addition it comes with the latest responsive framework, Bootstrap 3; as well as Google Fonts integration, Fontawesome Icons integration and supports Woocommerce for those who want to sell products online.

Integral was built with a strong focus on Typography, Usability and Overall User Experience. It features some unique design and functionality; here’s a quick run-down,

  • Image, Content & Video Slider (Popular Master Slider Plugin)
  • Fully Responsive (Tablet & mobile friendly)
  • Smooth parallax effect
  • Advanced theme options panel
  • Re-order sections (drag & drop)
  • Enable/disable sections
  • Translation ready (WPML)
  • One-page Layout
  • Sticky Navigation
  • Clean Code
  • WordPress 4+ Ready
  • Cross-browser Compatibility
  • SEO Ready
  • Contact Form 7 simple integration
  • 600+ Icons Included with FontAwesome
  • Built with Bootstrap 3
  • Flexslider for Images
  • jQuery Lightbox Popup
  • Woocommerce Compatible
  • Tested with most popular plugins
  • Portfolio slider
  • Portfolio grid with lightbox popup
  • Testimonials slider
  • Mailchimp & ConstantContact Newsletter Forms Supported
  • Well documented
  • Lifetime Updates & Support
  • 500+ Google Fonts Ready
  • Unlimited colors
  • Easy to customize (no coding required)
  • Well commented code
  • W3C validated HTML5/CSS3
  • Fast loading
  • Demo Content Provided
  • Super Easy Installation & Setup

Conclusion

Overall, Integral is a great start to our theme collection and sets a high standard for future themes. It’s perfect for anybody that places an emphasis on simplicity and elegance in their website or brand.

Integral comes in two versions; a free (Lite) version and an upgrade option with all features for $67. Click here to download or purchase instantly.

Novapress Pro v1.0.1 Released

Today we are releasing an update to our viral news blog theme – Novapress Pro.

Version 1.0.1 fixes a handful of bugs and includes one new feature.

See the list of changes below;

CHANGELOG

### 1.0.1 – 09/01/2016

  • Change name of theme from NovaPress to Novapress
  • Fixed missing prefixes from image names
  • Removed custom-header.php file
  • Removed unneccessary language files
  • Updated theme-welcome.php
  • Added customizer setting to change top header BG color

If you have already purchased Novapress Pro; log into your Customer Dashboard to download the theme.

To update your theme; follow these instructions

http://support.themely.com/knowledgebase/how-to-update-your-theme/

10 Free Travel WordPress Themes 2017

Reviewing Travel WordPress Themes in today’s release.  This week our list is a compilation of the best free travel WordPress themes for you.  Each of these themes can be found in the WordPress database (go to the WordPress.org theme directory).

If we’ve missed one that you think should be on this list let us know in the comments below.

Travelers

Travelers is a WordPress Travel Blog Theme built with Bootstrap and is fully responsive for all the screen sizes. It can be used for Personal, Blogging, Fashion, Lifestyle, Travel, Technology, Travel Agencies, Hotels, Tour Operators, Airlines, Photographic Agencies, blogger or any other types of blog site. Travelers theme comes with built-in widgets and widgets positions, customizer to customize and setup logo, color and layouts.

Live Demo    Download


VW Tour Lite

VW Tour Lite Theme is a responsive multi-purpose tour WordPress theme which is ideal for tour and travel websites. It is best suited for travel agency website, traveling or journey blog, tourism, hotels, tour operator, travelers, vacation, holiday, tourist agencies, travel diaries, tourist destinations, travel magazines, travel guides, etc. Also, it can be used for personal, blogging, fashion, lifestyle, travel, technology, travel agencies, airlines, photographic agencies, or any other type of blog site. This user-friendly theme is suitable with the latest version of WordPress.

Live Demo    Download


Tour

Tour is a Fully Responsive Tour WordPress Theme, a perfect choice for a travel agency website, traveling or journey blog, etc. Features include built-in slider, multi-level drop-down menu, W3C markup validated, right sidebar widget area, 3 Footer widget areas, header social icons, full-width page template, header and footer social icons, footer copyright, footer menu, background color and image, FontAwesome integration, translation ready and much more.

Download


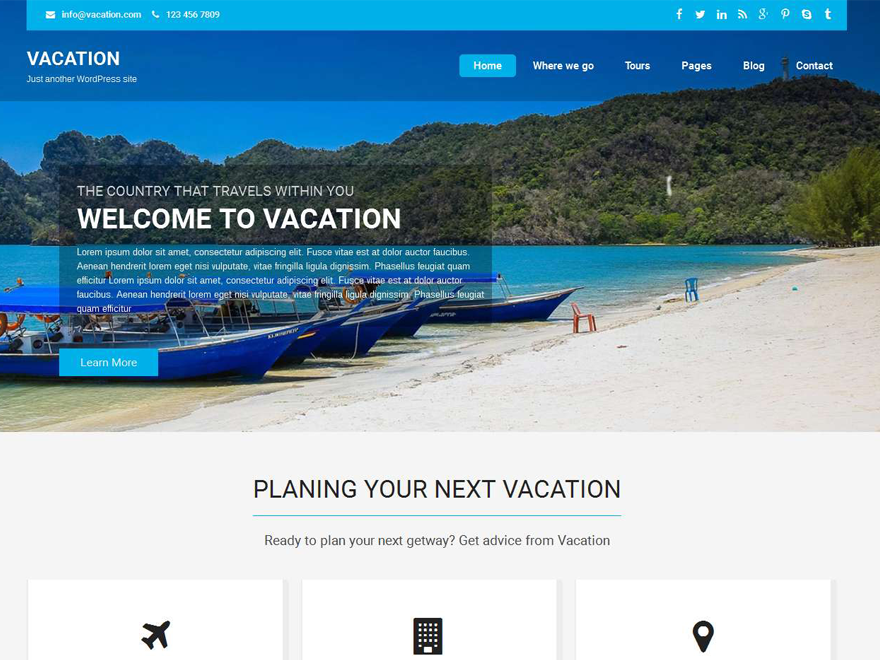
Vacation Lite

Vacation Lite theme is responsive holiday/tours and travels WordPress theme. This theme is responsive and compatible with the latest version of WordPress. This theme is comes with the latest feature and unique typography option. This theme can be useful for multiple industries like blog, magazine, corporate, cafe/restaurent, business, consultant, hospital, hotels, tours and holidays, creativity, shop store etc. This theme is comes with the traslation ready. Vacation Lite theme is cross browser compatible and perform well with any browser. This theme is very easy to use for non coders also.

Download


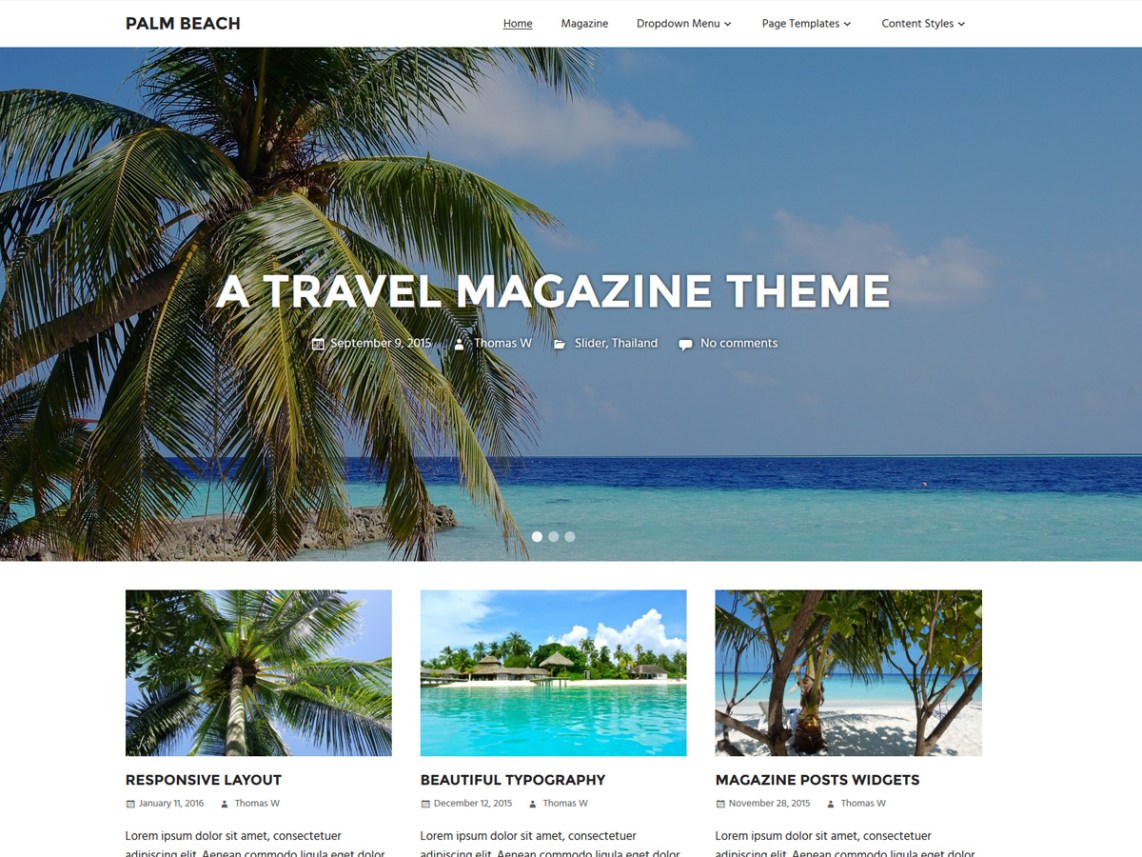
Palm Beach

Palm Beach is a professional WordPress theme perfectly suited for a travel magazine. It features a stunning fullscreen slider, beautiful typography and a three-column grid-layout for posts. Head off on vacation now!

Download


Wanderlust

Wanderlust is a big bold travel blog theme, designed to feature your beautiful travel photos and stories. The home page has an optional posts slider which let’s you set up a specific slider category for those posts you want to feature there. On the home page you can also choose to (optionally) feature some static pages right below the slider too. Of course you can set colors, social media links, and logo through the Customizer so you can make it your own without any coding required. Happy trails.

Download


Travel Notes

Travel Notes is a classic travel blog theme, big on images both from the featured post images and the optional Instagram integration. The theme supports the usual customization features, and also integrates an optional geo-tagging plugin so you can display posts by category on a map.

Download


Travel Addict Lite

TravelAddict Lite is a responsive blog theme that features a modern and clean design. Features include: a parallax header image, Metaslider integration, ability to use Google Fonts, social icons, full color control, custom widgets and much more.

Live Demo    Download


Travel Eye

Travel Eye is a clean and professional Travel WordPress Theme. This Theme is ideal for travel agencies, hotels, tour operators or any other organization related to travel and tours. It is powered by Page Builder by Site Origin, so drag-and-drop feature will be very handy to customize the page layout as you want. It has Theme Options panel based on powerful Customizer API which makes theme pretty easy to customize and configure. Prebuilt layout is available for home page so you can get your page layout in one click.

Live Demo    Download


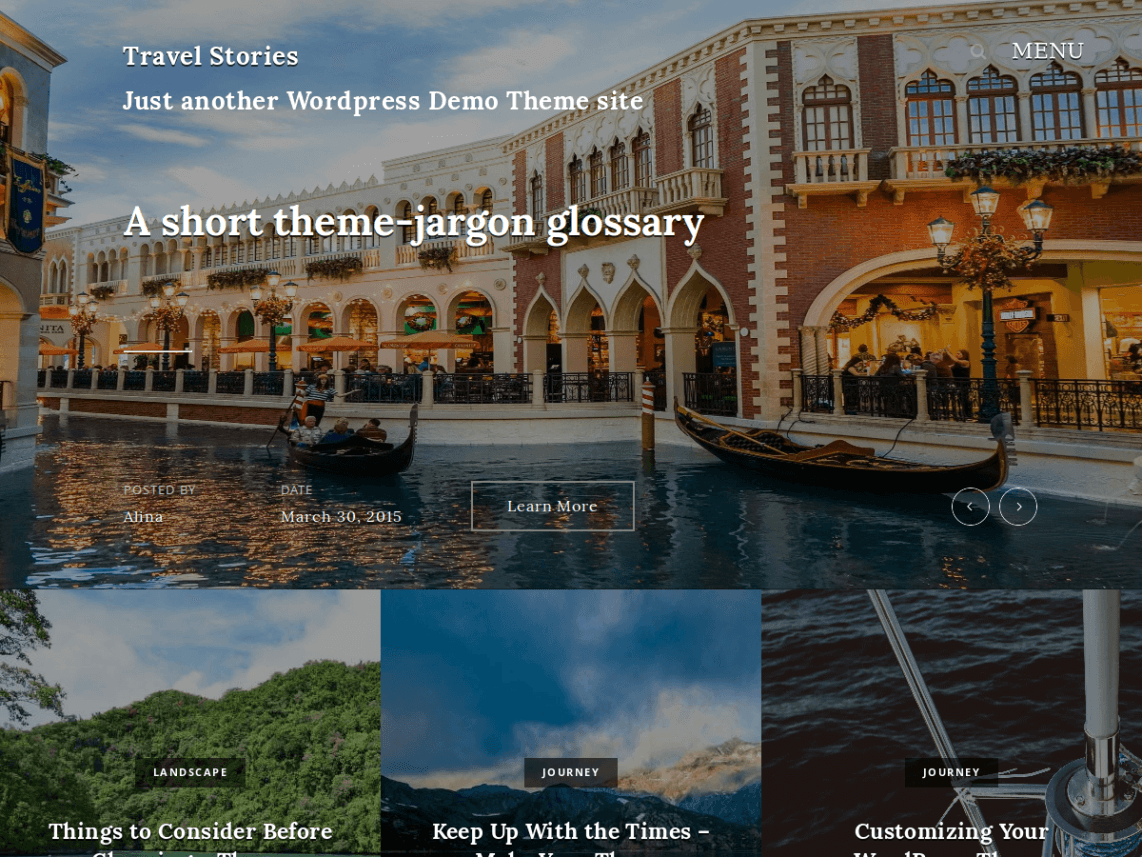
Travel Stories

Travel Stories is a fresh and clean theme for hotel accommodations, travel bloggers, travel agencies and other travel- and tourism-related websites. The theme includes an extensive documentation and is really easy to use. Travel Stories is perfect for people who need a ready-to-go website for their hotel or travel agency. Also, it is highly customizable to go with your marketing plan or to match your brand. Travel Stories will be awesome for Travel Diaries, Tourist Agencies, Travel Magazines, Tourist Destinations, Photography, Handmade and DIY Workshops, Travel Stories, Culture Overviews and Tutorials, Event Information, Cuisine, etc.

Live Demo    Download


css.php

Error: Please enter a valid email address

Error: Invalid email

Error: Please enter your first name

Error: Please enter your last name

Error: Please enter a username

Error: Please enter a password

Error: Please confirm your password

Error: Password and password confirmation do not match