How to Install a Contact Form on Your Website with WPForms Drag & Drop WordPress Forms Plugin

Utilizing a contact form on your WordPress website is a great way for your visitors to connect with you. If coding isn’t one of your strengths, then you can take advantage of the WPForms Drag & Drop plugin to do the job for you. With WPForms, you can create beautiful contact forms within minutes!

Contact Form by WPForms – Drag & Drop Form Builder for WordPress

WPForms creates a user-friendly contact form that can be built without any coding knowledge required. It has over a million active installations, making it the next most popular WordPress contact form plugin. This is a great option for beginners!

1. Install and Activate

Before starting, you will need to install and activate the plugin. Go to Contact Form by WPForm in the WordPress plugin directory to download the plugin. After downloading it, be sure to click activate so that it’s ready to go. Or, from within your WordPress Admin Dashboard go to Plugins > Add New and search for keyword wpforms. Then, click on Install and Activate.

Install and activate WPForms plugin

2. Exploring Contact Form by WPForms

In the admin panel of your WordPress, click on WPForms. To create the form, click on “Add New”. It will take you to a clean, immersive interface to start creating your contact forms.

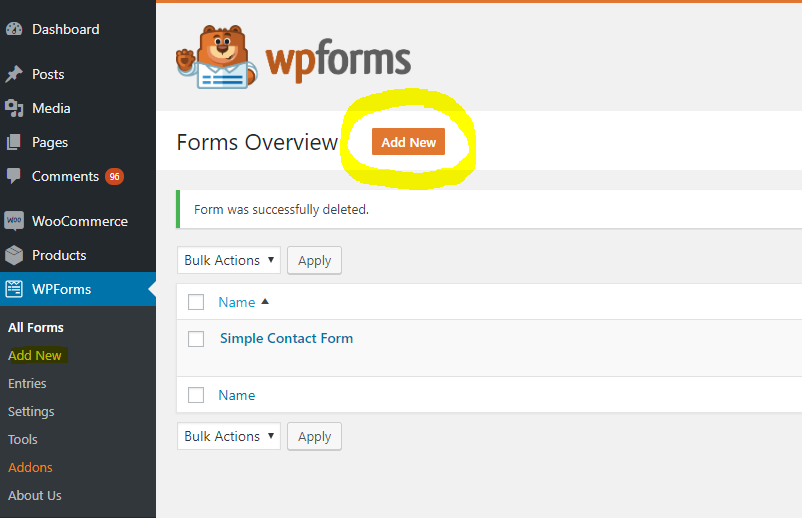
Click «Add New» to create a contact form

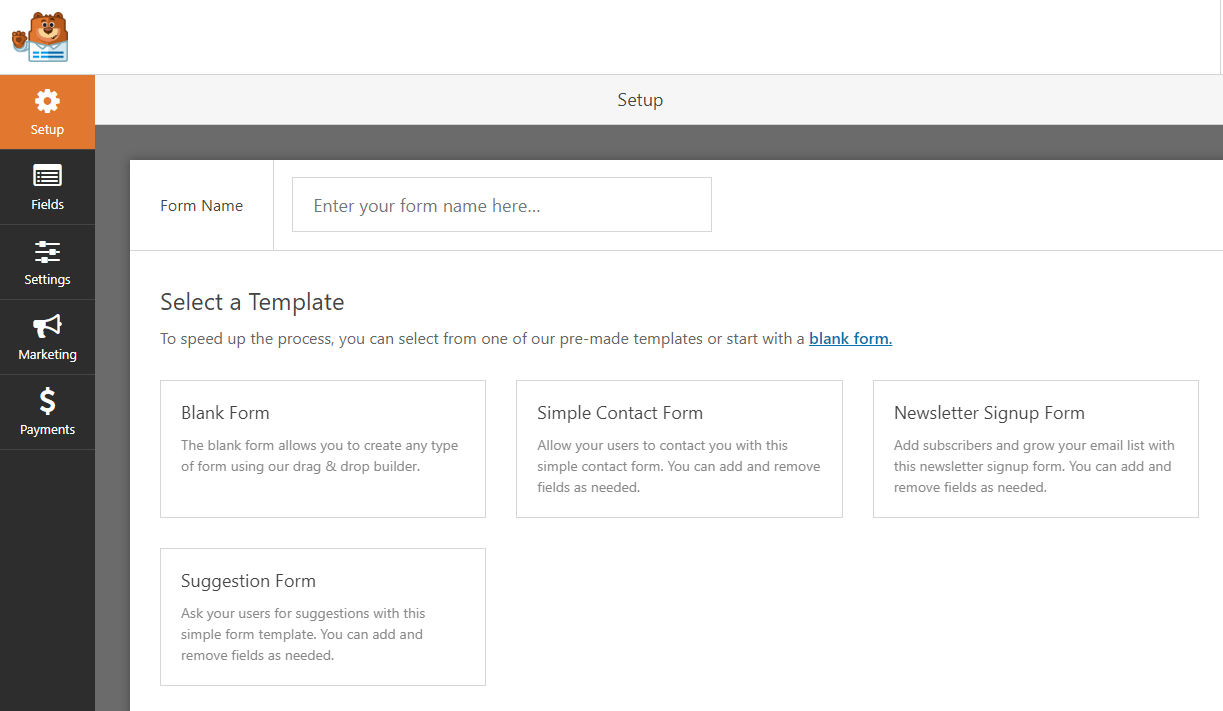
Choose between Blank, Simple or Suggestion form.

You will have a choice between using a blank form, simple contact form, or suggestion form.

  • Blank form: Allows you to create any type of form using the drag & drop builder.
  • Simple contact form: It’s exactly what it sounds like. It’s a simple form for users to contact you. You can add and remove fields as needed. Be aware that it has a lot of upgrades and upsell requests.
  • Suggestion form: Allows you to ask your users for a suggestion with the simple form template. You can add and remove fields as needed.

There are pre-made templates available, but only if you upgrade to the pro version. We find the simple contact form sufficient enough for what we’re looking for. Though the free version is a bit limited, it does the job.

3. Start Creating Your Contact Form

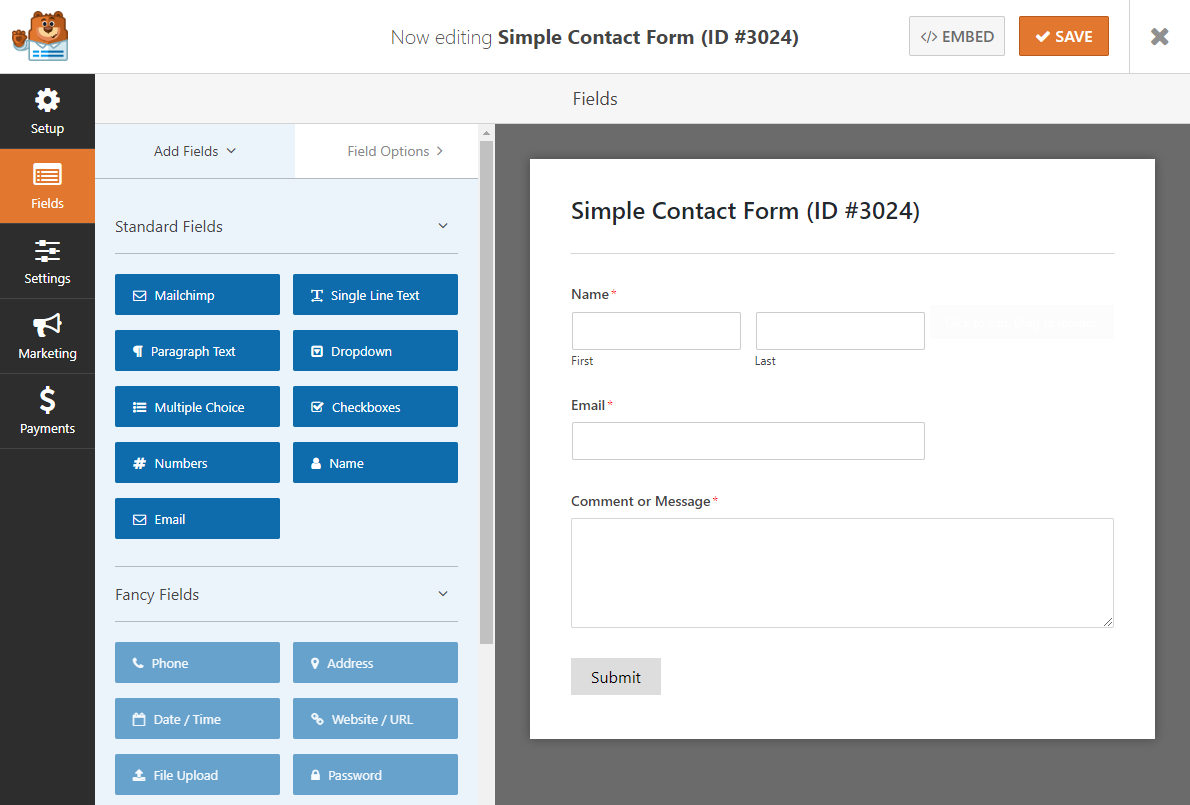
After selecting the form of your choice, you will see five panels to play around with on the left side.

Setup

This is where you will select a template to build your contact form from. You will have a choice between using a blank form, simple contact form, or suggestion form. If you upgrade to the pro version, you will have access to pre-made templates.

Fields

Within fields, you can start designing your contact form with various fields. With the free version of WPforms Drag & Drop WordPress form plugin, you will have access to:

  • Single line text
  • Paragraph text
  • Dropdown
  • Checkboxes
  • Multiple choices
  • Numbers
  • Name
  • Email

With the upgraded pro version, you will have access to fancy fields. Some of these include:

  • Website URL
  • Address
  • Phone
  • Password
  • Date/Time
  • File Upload

Unfortunately, the fancy fields are only for the upgraded pro version. However, WPForms Drag & Drop Forms plugin does the job for a simple contact form. The perfect thing about the WPForms contact form is the ability to drag and drop to move things around. You can click on the Field Options to edit the labels, description, and other advanced options.

Settings

Under the Settings panel, you will have access to change the general settings, notifications, and confirmations.

  • General settings: You will find the form title, form description, submit button text, and enabling anti-spam honeypot.
  • Notifications: Where do you want the email to go to? You can even utilize smart tags that pull information from the form itself to generate the email.
  • Confirmation: Here you can change the type of confirmation. It can be a confirmation message, show another page from your website or a redirect to another URL.

Marketing

The marketing panel is only available with the upgraded pro version. There isn’t much information on what’s included, but their website does state marketing and subscription. With the marketing features, you can create subscription forms and connect it with your email marketing service. Want to learn more about your users with geolocation data? They have that too.

Payments

Payments are also only available with the upgraded pro version. You can easily collect payments, donations, and online orders without having to hire a developer. They have an addon for PayPal and Stripe to make the job easier.

4. Save and Embed Your Contact Form

After creating the form, you’re finally ready to save and add it to your website. Be sure to click on “SAVE” before embedding your contact form. There are two ways to embed your contact form to your WordPress website.

Save and embed your contact form

Embed With A Shortcode

The first way is to embed the shortcode within your page or post. Simply click on “EMBED” and copy the shortcode given, then save it wherever you like.

Embed Within the Post/Page

The other way is to go directly to the backend of the post or page and click on “Add Form”. From there, you can select the form you want to add and that’s it!

5. Publish!

Don’t forget to click save and publish your web page with the new contact form. You will be able to see how it looks and even give it a test run. If there’s anything that you’d like to change, you can easily go back into WPForms Drag & Drop to edit without needing to re-embed the form.

Now you have a fully functional contact form that is ready to be used. This plugin is perfect if designing isn’t your forte. Best of all, it’s free to install! For additional support and features, you can upgrade to the pro version. However, I’d say that it already comes with a significant amount of features that are extremely customizable and versatile for any WordPress site.

WordPress Performance: 10 Ways to Reduce Page Load Time

After putting hours into building a WordPress website, you’ll want to ensure that it’s pages are loading quickly. A slow-performing WordPress website can cost you visitors, reduce your ranking on search engines, and affect the overall user experience. Here’s 10 ways to reduce page load time that we’ll outline in this article.

1. Find an Optimal Hosting Service

To reduce your page load time, you have to double check the speed of your hosting server. If the server is slow, then your site is going to be slow as well. Many providers will overload their services, which can result in CPU starvation and IO issues. To quickly test the TTFB (Time to First Byte), you can use a tool such as Key CDN Web Performance Test.

Ideally, you want your speed to be around 200-400ms, though location does factor in. For example, the speed will probably in the 200-400ms range in North American countries but different elsewhere. When testing the TTFB, it’s a good idea to run multiple tests over the course of a day to find the overall average.

If the TFFB is consistently high and you notice access to your control panel is slow or suffers from downtime’s and errors, then it’s probably time to change your host.

2. WordPress Stack

Your WordPress stack consists of the Web Server, Mysql, PHP, and other smaller components to power your website. By optimizing your WordPress stack, you can reduce page load time.

The Web Server: You can use Apache for light use, but you will need to consider switching as larger loads will affect the performance. For greater load and shared hosting servers, focus on finding a provider that uses Litespeed or Nginx. They’re much faster and more stable under greater loads.

The PHP: Use PHP 7.x as it gives a large increase in performance over PHP 5.6. If your WordPress host or theme doesn’t have it, then it’s time to find a new one.

Caching: Use a host that offers true caching at the server level. I recommend Litespeed LsCache and Vanish to provide the most optimal service.

3. Live Visitor Monitoring and Recording

Instead of using a plugin for live visitor monitoring and recording, I recommend using Google Analytics instead. While plugins like this are great for tracking your traffic, they can slow down the performance of your website.

Google Analytics is a perfect way to monitor and record live visitors because it doesn’t affect your WordPress performance. It’s an external service that is integrated with your WordPress website. It does all the work for you while reducing page load time.

4. Themes and Visual Composer

Poorly constructed themes and most drag-and-drop page builders, such as Visual Composer, will slow down your website’s performance. Avoid using them if you can. Instead of drag-and-drop page builders, try going with child themes based on frameworks like Genesis or Thesis.

If coding isn’t one of your strengths, you can find pre-made WordPress themes that are easily customize-able. Stay away from drag-and-drop page builders if you want a fast performing WordPress website.

5. Plugins

Plugins are great for customizing your WordPress website but similar to the live visitor monitoring, or drag-and-drop page builders, they can affect your website’s performance. Deactivate and discard of any plugins that you may not need. Always do your research before adding them to ensure that you’re only using what you need. Remember, less is more!

6. Bots and Crawlers

To reduce page load time, you can configure Wordfence crawl-limiting rules to help block fake and aggressive crawlers, bots, and spot. In your robots.txt file, use this:

User-agent: *
Crawl-delay: 10

Most “good” crawlers will obey this as Wordfence takes care of the rest.

7. Removing xmlrpc.php

Most people don’t need xmlrpc.php and it can be removed. The most common plugin that uses this is Jetpack, so you may need to weigh the pros and cons. If you don’t need Jetpack, I would recommend removing it because it’s a very heavy loaded plugin that can affect your WordPress performance.

8. Disable or Slow Down WordPress Heartbeat

If you have the Heartbeat Control plugin, I recommend disabling or slowing it down. It’s a tool that provides real-time communication between the server and the browser when you are logged into your WordPress admin panel, but it can cause a lot of performance issues.

However, disabling Heartbeat Control should only be done if you have identified that it’s the cause of high CPU use. To identify this, you can:

  1. Check your access_logs to see if you see a ton of calls like “POST /wp-admin/admin-ajax.php” and the timestamps match with a CPU spike.
  2. If your provider uses cPanel and CloudLinux, you probably have a feature that takes a snapshot when there is a resource spike and shows the cause which will also list admin-ajax.php.
  3. If you have root access, you can monitor with “top -c”.
  4. Tailing the users access_logs in real time.

9. Disable WordPress Cron

Instead of using WordPress cron to fire every time someone visits your website, disable it and set a system cron instead. This will help with your WordPress performance to reduce page load time.

This can be done by adding the following to your wp-config:

define('DISABLE_WP_CRON', true);

Now in your control panel, set a system cron with the command:

/usr/local/bin/php /home/user/public_html/wp-cron.php

10. Analyze the Logs

Logs are extremely useful in telling you when something is wrong with your WordPress website. They can be used in diagnosing performance and instability issues. The two main logs you will need to know are error logs and access_logs.

Familiarize yourself with them to learn about any errors or entries that can occur. You will gain a much better understanding of how your WordPress website works!

By following these 10 tips and tricks, you will see a significant increase in your WordPress performance. You will notice a reduced page load time and a greater experience for your visitors!

WordPress Maintenance Checklist: 10 Essential Tasks to Perform Regularly

If you landed on this page, you most likely want to learn more about WordPress maintenance. It’s a hot topic and many WordPress users like you – are searching for the best tips to make sure their sites run smoothly.

And yes, unless you are running a huge business site, you will be able to do your own WordPress site maintenance.

Hiring a WordPress maintenance agency to take care of your site is awesome. This way, you can fully focus on scaling your business or spending time with your family.

However, if you are on a tight budget or you are passionate about WordPress, you can do your own site maintenance.

Don’t know how to start? Here is our WordPress maintenance guide; it’ll help you maintain your site like an expert.

Mandatory Tasks (Red Code)

WordPress maintenance covers a large array of activities; all of them are important, but a few activities are critical for the existence of your site. Unfortunately, users have a tendency of ignoring some of these important tasks.

Website Security

You must be aware that a site is never secure enough. Website security isn’t an endpoint, it’s a journey. Start this journey by installing a security plugin. Luckily, developers have created plugins that considerably strengthen site security. In no particular order, check these plugins aimed at securing your site: Wordfence, Defender, All in One WP Security and Firewall, and Sucuri Security.

These plugins do most of the legwork for you, but it’s still not enough. You have to do a few other tasks like:

  • Username and password audit. Are you using “admin” as a username? You have significantly simplified the work of a hacker. Audit your passwords and change them regularly.
  • Check the users and their contributions. Delete users that don’t need access to the site anymore, or reduce their privileges. More or less, each user is a vulnerability, so deleting them improves security as long as it doesn’t affect the site performance.

Regular Backups

You don’t appreciate the value of a backup copy of your site until you desperately need one in emergency situations. Don’t make the same mistake, your site must have a safety net! UpDraftPlus, BackupBuddy, Duplicator, and BackWPUp are some of the most used backup plugins.

Install your backup plugin of choice and look through all its options. Most plugins allow you to perform automated site backups, and let you choose the backup frequency and where to save the files. If possible, set up more remote locations to save the backup copy.

Don’t forget to check the existence and integrity of the backup copies from time to time.

Update Everything

Updating your WordPress version, themes, and plugins is a snap. We wrote previously on how to update WordPress to the latest version, while updating the themes and plugins is a matter of a few clicks. Users ignore it probably due to its simplicity.

Don’t make the same mistake. Even minor updates may contain patches that improve the security of your site. Check out this table featuring WordPress vulnerabilities; a hacker has more than enough opportunities to harm your site if you use an old version of WordPress.

Have you ever heard of the Panama Papers? This was a huge data leak revealing how wealthy people and political leaders hide their money in offshore entities. It seems like a Revolution Slider plugin vulnerability let the hackers steal huge amounts of data. Hiding so many secrets and getting hacked due to a plugin that wasn’t updated…not cool at all, right?

Check Site Indexability

Lots of people simply don’t check whether their site is indexed by search engines, especially by Google. That’s because not many sites are deindexed, but that’s still not a good enough reason to not check if your site is being indexed by search engines.

All you have to do is to search site:yoursite.com in Google and look at the search results. Google has indexed your site if the results are webpages of your site. Take a look at Google Analytics and Google Search Console for more details about your indexed webpages.

Test Your Forms

The vast majority of sites have at least a contact form. You may lose precious leads if you didn’t configure the form properly. A basic test is to send yourself a message via the contact form. Did it arrive in the desired inbox? Cool…the form works and you haven’t missed any good opportunities.

Highly Recommended (Yellow Code)

Red Code recommendations are to keep your site secure, indexed by search engines and reachable by leads. Yellow Code suggestions are to make the site more attractive to visitors. I doubt that your site will generate solid revenue if you don’t apply the following tips.   

Speed Improvement

Some people claim that speed is the new SEO. This is an exaggeration, but certainly, a fast loading website is a must-have for a profitable business.

Start your speed optimization process by benchmarking your current asset. GTMatrix or PageSpeed Insights are great tools to test a site’s loading speed. These provide quality data and useful tips to improve loading time.

The hosting performance matters a lot in the speed equation. Evaluate the host quality and choose a superior plan, or change the provider. The theme used is another determinant factor – is it built with speed in mind? Is it built using the latest technologies?

Next on your speed improvement strategy would be a caching and image optimization plugin. WP Super Cache and  W3 Total Cache are good caching plugins, while Smush It and Short Pixel optimize images properly. Millions of users are satisfied by these four plugins, so test drive them confidently.

Last, but not least, delete unused themes and plugins. These slow down the loading speed and may contain vulnerabilities.

Database Optimisation

Blog posts, comments, and categories are all stored in tables within a database. If you are not a techie, you may have disregarded this, but you can’t ignore cleaning up the database. The default WordPress installation is made up of 12 tables, but many installed plugins generate new tables. Over time, these additional files make your site load more slowly.

Experienced users know how to clean up a WordPress database, but you can do it faster and easier with plugins. WP-Optimize accurately cleans up WordPress databases, use it worry-free!

Uptime Monitoring

Perfect is the worst enemy of done, and website up-time is a living testament to this statement. Your site can’t be available 100% of the time, but you have to do everything possible to strive for perfection.

Use your up-time monitoring tool of choice and audit the site downtime. Determine the causes of downtime periods and craft a strategy to reduce them. Usually, server updates and site maintenance are responsible for your site being unavailable.  

Recommended (Green Code)

The following tasks are less important than the previous ones, but they must be performed if you expect your site to attract leads and clients. They are simple to accomplish but can be time-consuming in some cases.

Comment Moderation

Comment moderation is a delightful activity when users’ contributions are on-topic. Sadly, the majority of comments submitted are about improving sexual life and paying a commission to earn a huge amount of money!

Nowadays, comment moderation is almost equivalent to spam removal. Use Akismet plugin to save you time; it works miracles against spam comments. However, Akismet isn’t perfect, so it’s recommended to look through comments before letting the plugin delete them permanently.

You may delete insightful comments if you follow it blindly, which will only annoy your users. Don’t forget to reply to genuine comments – readers appreciate that you care about their opinions.

Check Internal and External Links

You linked to other sites through your posts, but some sites have been abandoned, and linking to them hurts the user experience. Go to Google Analytics and Google Search Console and check for broken links.

This Wordstream tutorial can help you with this. Still, once again, a plugin does the legwork for you –  for instance, Broken Link Checker monitors your site and looks for broken links.

WordPress maintenance isn’t limited to just these tasks, but these are essential for running a functional site. Use this checklist to ensure your site runs smoothly. Do you have an important tip to share with us? Please leave us a comment and share your WordPress maintenance tips and tricks!

WordPress Security: Step-by-Step Malware Removal Guide

It’s common for websites to contain vulnerabilities and be prone to infections at any time. Paying for an additional service to have it removed can be costly. Instead, you can learn about malware removal on your own. In this guide, you will learn how the step-by-step process of removing malware, fixing the vulnerabilities and removing websites from the blacklists.

Before Starting the Malware Removal Process

Before starting the WordPress malware removal process, you will need to lock down your website. This is to ensure that during the process, only you will have access to the website. This can be done through your hosting service to put the site into a maintenance mode. If you can’t find it, there are other ways to lock down your website:

Apache

Open your .htaccess, sometimes called htaccess.txt, file and write the following lines on top:

order deny,allow
# Deny access from all IPs
deny from all
# Allow access from specific IP
allow from YOUR IP ADDRESS

Nginx

Open your nginx.conf file and write the following lines:

location / {
# allow your IP below
allow 127.0.0.1;
# drop rest of the world
deny all;
}

1. Install Anti-virus Software on All Computers From Where the Site is Accessed

It can be common that your FTP access, /wp-admin/ username and password credentials are leaked through the keylogger or computer virus. Having antivirus software installed on the computer from where you access the admin panel or log into your hosting server or FTP is essential.

Using the antivirus software, scan your computer for possible malware. Be sure to also take a look at your operating system security settings to make sure that the firewall is turned on. It also helps to frequently update your operating system, web browsers, and browser extensions.

2. Change All Access Codes (Hosting, SSH, FTP, MySQL, WP Users)

To prevent your credentials from leaking, you should change them one by one. Change your hosting panel password, then revoke all FTP accounts and create new ones with pre-generated passwords. If your host doesn’t automatically do it, use a password management tool such as LastPass to generate a secure password.

Changing WordPress Admin Panel Credentials

Through your WordPress admin panel, delete all inactive accounts then edit each active account one by one to suspend all sessions and generate new passwords.

Changing Database Credentials

When changing the MySQL or a database password, you will also need to update this information on your wp-config.php file.

Changing Salts

Salts are used to safeguarding stored passwords from being read. After a breach, a new salt is generated for each password and it’s important to replace the old salts with the new ones in your wp-config.php file.

We recommend changing these codes on a regular basis to improve your website security (every 3 – 6 months). You can manually generate the Salt keys from WordPress.org secret-key service.

3.  Fully Backup Your Website

It’s always important to download all of your file server content and database to a local environment as safety. This can be done with SFTP, SSH, or through PhpMyAdmin panel.

SFTP

This method is a secure version of FTP, which is used for transferring files from one database to another. Access codes are found in your hosting account as the regular FTP access codes. SFTP port is 22 while FTP port is 21. You can access the service with a client such as FileZilla for this.

SSH

Some hosting servers will give you SSH access to make things much easier. It will generate a .zip file with all your files on your hosting account, which can later be downloaded directly over SFTP.

After logging into your WordPress website with SSH access, perform the following:

zip -r backup-pre-cleanup.zip

Database

Through your hosting service, you can find the PhpMyAdmin which allows you to manage the database. You can easily export the entire database within the PhpMyAdmin panel. Save this to the same folder, “backup-pre-cleanup”.

You can also export your database via SSH with the following command:

mysqldump -p -h hostname -u username database > backup-pre-cleanup.sql

After exporting it with SSH, be sure to download this to your local environment and delete it from the file server.

4. Analyze Logs and Recent Changes

Logs are great to detect changes and analyze for incidents. You will be able to download access logs from your hosting service. With the logs, you will need to open it with a software such as Sublime Text and search (control + F) for “POST” method. Look at the dates to see if any PHP file has been added to the server. Also, look at events around suspicious behavior to see if you can catch anything.

You can also check which PHP files have been recently updated by running the following command through SSH:

find . -type f -name '*.php' -ctime -7

To see if any JavaScript files have been added or modified, run the following command:

find . -type f -name '*.js' -ctime -7

To see all the files, permissions, and attributes that have been modified in the past 7 days, you can run this command:

-ctime -7

You can change the number lower/higher depending on the need while:

-7 = modified in less than 7 days

+7 = modified more than 7 days ago

5. Update Your PHP Version

Updating your PHP version to 7 will not only secure your website, but it will make your website run twice as fast compared to PHP 5. It also has a 50% better memory consumption, so you should quickly upgrade to the latest version.

6. Update Your WordPress Installation

Don’t ignore the WordPress installation notifications. Your website can get infected if it has outdated code, plugins, or themes installed. Websites with too many plugins or weak passwords are common reasons why WordPress websites get hacked.

Remove Unused Plugins and Themes

You should deactivate and remove any plugins and themes that aren’t in use. By just deactivating it, it will still stay on the server and can still be exploited if it’s vulnerable. We recommend removing software that isn’t being used to reduce the risks of outdated and vulnerable software.

7. Set Proper File Permissions

By default, all folder permissions in WordPress should be 750 while all files should be 640. The only exception is wp-config-php which can be as low as 400. Avoid having any file or directory set to 777.

You can change all folder permissions to 750 through SSH with the following command:

find /path/to/your/wordpress/install/ -type d -exec chmod 750 {} \;

You can change all file permissions to 640 through SSH with the following command:

find /path/to/your/wordpress/install/ -type f -exec chmod 640 {} \;

You can change wp-config-php permission to 400 through SSH with the following command:

chmod 400 /path/to/your/wordpress/install/wp-config.php

8. Remove Symbolic Links

Access can be gained to root or higher folders in your hosting server if vandals try to symlink folders. Please be sure there are no symlinks before changing file and directory permissions. If a symlink goes undetected and you try to delete the linked folder, you might end up deleting all the files in your server. To avoid this from happening, use the following command through SSH and wherever you see the suspicious folder:

find . -type l -exec unlink {} \;

9. WordPress Malware Removal Through Files

There are various things you can do to detect suspicious files automatically and manually. We recommend doing as much as you can to be sure that WordPress malware removal is done correctly.

Manually Compare Clean and Infected Files

Create a new WordPress installation and install the exact same plugins and themes to ensure that everything runs at the same version. Create a new folder to your local environment named “Compare” and add 2 folders inside the folder called, “Clean” and “Infected”. Using SFTP, download the new WordPress installation and save this to the “Clean” folder. Now open your previous backup, find the WordPress installation, and copy it to the “Infected” folder.

Now download Beyond Compare to compare the two folders while keeping your main focus on PHP and JavaScript files to see which are different from the original. Open your SFTP access to the original website and open the “Clean” folder locally.

If Beyond Compare is telling you that index.php files are different in these two folders, move as many files from “Clean” folder to your website and see if the website is working properly after replacing each one. If the website breaks, then revert it by uploading the same file back to the server form the “Infected” folder.

If you feel comfortable with the terminal, you can also use a command through SSH like this:

diff -r wordpress-clean/ wordpress-infected/ -x wp-content

Removing PHP Files From Uploads Folder

PHP files should never be in the uploads folder, but they can end up there whenever a vulnerable upload functionality if being exploited.

To remove the PHP files from the uploads folder, open up your SSH terminal and navigate to /wp-content/uploads and run the following command:

find . -name "*.php"

Finding and Removing Backdoors and Malware

Web-shells, also known as backdoors, and malware are often hidden to avoid detection from automatic malware scanners. They can be removed manually with the following steps:

Some functions that are commonly used in backdoors and malware are:

eval(), base64_decode(), gzinflate(), str_rot13()

To locate these files, open your SSH terminal and run the following command:

find . -type f -name '*.php' | xargs egrep -i "(mail|fsockopen|pfsockopen|stream\_socket\_client|exec|system|passthru|eval|base64_decode) *("

Use this command to look for backdoored image files:

find wp-content/uploads -type f -iname '*.jpg' | xargs grep -i php

And iframes:

find . -type f -name '*.php'  | grep -i '<iframe'

To automatically remove backdoors and malware, you can use OWASP web malware scanner, Ai-Bolit malware scanner, and PHP malware scanner. Be sure to manually compare clean and infected files to ensure there are no suspicious files left.

10. WordPress Malware Removal Through The Database

It’s common for malware to be injected into the database and loaded to the website through posts, pages, comments, and other website content. There are different ways to perform WordPress database malware removal.

Searching for Suspicious Content From the .SQL Database Backup

Open the .SQL file directly with Sublime Text and use Control + F to find malicious content from the database.

Search for iFrames: <iframe

Search for base64: base64_decode

Search for eval(): eval()

Search for scripts: <script

List all the malicious findings and try to understand where they are located. Don’t delete them directly from the database backup. Proceed to editor one-by-one and select Text mode, then delete malicious code and if needed, reformat the content. Look at the comments and delete possible spam.

Searching for suspicious content via PhpMyAdmin

If you have access to PhpMyAdmin, you can directly search for similar entries with the search option. If you’ve detected a malicious content, try to understand where it was added. Then, proceed to editor one-by-one and select Text mode, then delete malicious code and if needed, reformat the content. Look at the comments and delete possible spam.

11. Check the Site Manually and From a Search Engine Perspective

View your website as a visitor to see if you can find anything suspicious or if the website isn’t performing well. Also try looking up your website on search engines, such as Google, with the query “site:mywebsite.com”.

If you see weird characters or suspicious Canadian offerings in Google results, then your website is probably infected with SEO malware that is only visible on Google and other search engine crawlers.

Install User-Agent Switcher extension for Google Chrome, which allows you to see your site from the search engine perspective. You can set a custom user-agent from the extension settings, the most popular user-agent used by Google bot is:

Mozilla/5.0 (compatible; Googlebot/2.1; +http://www.google.com/bot.html)

Try visiting your website again with the Googlebot user-agent and don’t see different content, then you have successfully removed the SEO malware. If it still looks weird, then go through the malware removal process again.

After the Malware Removal Process

Restore Public Access to the Website

After removing the malware and you feel confident that your website is now clean, remove the restrictions from your website. If your hosting server blocked your access, ask them to rescan your website and to restore public access to your website.

Ask to be removed from Blacklists

You can check to see if your website has been blacklisted by any AV vendors or search engines by using VirusTotal. If you’re blacklisted by Google Safe-browsing, you can log into Google Webmaster Tools and request a rescan.

If you’ve been blacklisted by AV vendors or other search engines, simply contact them to request a rescan.

Disable PHP execution in /uploads/ and /cache/ folders

Add the following codes in your configuration to prevent PHP usage inside /upload/ and /cache/ folders.

Nginx:

# Deny access to PHP files in any /uploads/ or /cache/ directories
location ~ /uploads/(.+)\.php$ { access_log off; log_not_found off; deny all; }
location ~ /cache/(.+)\.php$ { access_log off; log_not_found off; deny all; }

Apache:

Create a .htaccess file to /upload/ and /cache/ folder and write following inside both of the files:

# Kill PHP Execution
<Files ~ "\.ph(?:p[345]?|t|tml)$">
deny from all
</Files>

To prevent future malware infections from happening, be sure to keep your WordPress updated and use a secure hosting service. Have a managed firewall that is always updated with the latest security risks to avoid potential threats. Since WordPress sites are constantly attacked by botnets and hacking scripts, hide default admin panel and disable file editing options directly from the WordPress admin panel. This can be done by adding the following code in your wp-config.php file:

## Disable Editing in Dashboard
define('DISALLOW_FILE_EDIT', true);
How to Migrate Your Blog from Medium to WordPress

How to Migrate Your Blog from Medium to WordPress

Medium is a great platform and community for writers to publish their content—it’s where everyone has a story to share. However, recently more people are starting to migrate away from Medium to other platforms such as WordPress. Here’s a post and followup discussion on HackerNews about why some people are moving away from Medium.

While migrating away from Medium may seem like a pain, it’s actually very simple to do! It can be done in four simple steps, which will be outlined in this guide.

It’s also not a bad idea considering there are many benefits to using a self-hosted WordPress website. Some of the many benefits include:

  • The absolute ownership of content on a self-hosted WordPress website versus a community-based platform like Medium
  • You will have full control of your brand and content promotion
  • Unlimited design and customization with themes, CSS, and plugins
  • The ability to add and manage multiple users and content moderators
  • Trusted and utilized by many. It’s the largest content management platform in the world!

In this guide, I’ll show you how to migrate your blog from Medium to a self-hosted WordPress using WordPress.com as an interim step. This interim step is important because the exported file from Medium won’t be compatible with your self-hosted WordPress site. By using WordPress.com as the middleman, it will convert the Medium file to the proper format for the final migration process.

This can be done within minutes without any downtime! In the end, you’ll be able to enjoy and own full ownership of your content on a self-hosted WordPress site.

Step 1: Download your Content from Medium

Download Your Content from Medium

Download Your Content from Medium

The first step is to gather up all your content to prepare for the migration. This can be done from the settings page in your Medium account.

Next to “Download your information”, click on the “Download .zip” button. A zip file of your content will be e-mailed to you.

As stated earlier, this .zip file will not work if you upload straight to the self-hosted WordPress site. You will need to continue onto the next step to get the proper format for the final migration process.

Step 2: Import your Content to WordPress.com

Before importing your content to a WordPress.com blog, make sure that you’re using a fresh copy with no existing content. If you’re uploading your Medium content to an existing WordPress.com blog, in the final step you will be exporting all of the content that’s currently on it. Unless that’s your intention, create a new one to work with.

Once you’re completed all the steps in this tutorial, you can then delete the WordPress.com blog. To set up a fresh WordPress.com blog click here.

Lucky for you, WordPress.com has a built-in feature that allows you to easily import your Medium file. With just a click of a button, your files will be uploaded straight onto the platform.

Log in to your Admin Dashboard and go to My Site → Settings and select Import from the Site Tools section at the bottom.

Click Start Import next to the Medium importer.

This is where you will upload the .zip file you downloaded from Medium. Simply drag the file into the import window, or manually navigate to it.

Click Continue once the file has been uploaded. The import will take approximately 15 minutes to complete.

Screen Shot 2017-02-27 at 1.33.30 PM.png

You will receive a notification when the import process completes. All of your Medium content will now appear as posts on your site under the original date of the post, along with their original tags.

Step 3: Export Your Content from WordPress.com

After importing your content to WordPress.com, you will need to export it! Since WordPress.com and the self-hosted WordPress run on the same framework, they will be compatible with the same file formats.

In your Admin Dashboard go to My Site → Settings  and select the Export option in the Site Tools section at the bottom to download a copy of your blog’s content. The content will be delivered as a series of .xml files, that will contain your posts, pages, comments, categories, tags, and references to your site’s images. These files are also referred to as WXR (WordPress eXtended RSS) files.

If you’d like to export all of your content, just press the Export All button. If you’d like to export a subset (a single author’s posts, for example, or a certain category or date range), click the arrow next to the Export All button to see the advanced options.

Export Selected

Once you’ve selected the content you wish to export, press the Export Selected Content button.

At this point, you can remain on the export page to wait for the export file to become available. A handy notification will appear, offering you a download link.

Export Success

The link will contain a download of a .zip file containing any export files (larger blogs will include more than one export file). This ensures that your export process will be fast, and complete successfully. When importing back into another blog, you’ll need to unzip the file, and import each of the .xml files individually.

It’s safe to navigate away from the screen once the export is in progress. You’ll also receive an email with a link to the export file, which will remain available to download for up to a week.

Note: This will ONLY export your posts, pages, comments, categories, and tags; uploads and images may need to be manually transferred to the new blog.

Step 4: Import your Content to your Self-Hosted WordPress Website

For this final step, you’ll need to use the default WordPress Importer plugin. Navigate to Tools > Import and click on Install Now under WordPress.

Install WordPress Importer Plugin

Install the default WordPress Importer Plugin

Once installed, click on Run Importer and upload your WXR (.xml) file from the previous step.

Import your Content to your Self-Hosted WordPress Website

Select your WXR (.xml) file & click Upload File and import button

Depending on how much content you have it can take anywhere from a few seconds to a few minutes. Be patient and let the process run.

Once the import process is complete check your site by looking through all your posts to ensure all the content is there. If there are any issues, go back a few steps to make sure that you imported and exported the correct files. Remember to double check those file formats!

Now you’re all set and ready to continue your journey on WordPress! While Medium is still a great platform, I’m sure you’ll enjoy the ownership and customization that WordPress has to offer.

How to Add a Simple jQuery Script to WordPress

How to Add a Simple jQuery Script to WordPress

Most WordPress site owners & developers use plugins to add functionality to a WordPress site, but what if you don’t want to use a plugin? What if you want to create your own function by adding a simple jQuery script to WordPress?

In this step-by-step guide, I’ll show you how to add a simple jQuery script to your WordPress website.

Step 1: Create Your jQuery Script File

Start by creating a file with your jQuery code written inside the file. For example, your file name may look like this,

your-script.js

When adding your jQuery script to the .js file, you don’t need the <script> tags. When working with jQuery, you simply use ‘jQuery’ at the start of the function rather than ‘$’.

Here is an example of how your jQuery script may look like:

jQuery(document).ready(function($) { 
    $('#nav a').last().addClass('last'); 
})

Step 2: Create a Folder Within Your Theme Folder

Within your theme folder, create a sub-folder titled “js”.

Next, add your jQuery script file to this folder. The location of your file should look something like this:

wp-content/themes/your-theme/js/your-script.js

Step 3: Enqueue Your jQuery Script

Next, you need to tell WordPress to load the jQuery script file with your theme.

You can do this by enqueueing the .js file in your theme’s functions.php file. If you’re creating a theme from scratch, then you will need to create the functions.php file. If you’re working with a child theme, then be sure to check to see if the parent theme has jQuery added already.

Within the functions.php file, you will want to use the wp_enqueue_script() function to add your script while also telling WordPress that it depends on jQuery.

To do that, your code should look something like this:

add_action( 'wp_enqueue_scripts', 'add_my_script' ); 
function add_my_script() { 
    wp_enqueue_script( 
         'your-script', // name your script so that you can attach  
         other scripts and de-register, etc. 
         get_template_directory_uri() . '/js/your-script.js', // this
         is the location of your script file 
         array('jquery') // this array lists the scripts upon which
         your script depends 
    ); 
}

Step 4: Test it Out

If your theme has wp_head and wp_footer functions included in the proper files, this should work perfectly. If your code doesn’t work, I would suggest using a troubleshooting tool such as Chrome Developer Tools.

Utilizing jQuery on your WordPress site may seem like a daunting task at first, but it’s actually much easier than you think. Once you master the ability to code and add scripts to your WordPress site, you won’t have to depend on third party plugins to add functionality any longer.

Your PHP installation appears to be missing the MySQL extension which is required by WordPress

Your PHP installation appears to be missing the MySQL extension which is required by WordPress.

This error is generated in wp-includes/load.php. Go to your WordPress directory and go look at that file and search for the line that has the error message.

Look at the “if” statement above it to see what MySQL extensions your version of WordPress is trying to use. If it’s checking for “mysqli” and other MySQL extensions, that’s a good thing, and you just have to make sure one of those supported extensions is installed.

If it’s only checking for the “mysql” extension, the problem is that extension has been deprecated and is no longer installed with new versions of PHP. You have to either upgrade your WordPress installation, or see if it is possible to install the “mysql” extension with your version of PHP.

WordPress vs Medium 2019 Which is Better to Make Money Online

WordPress vs Medium 2019: Which is Better to Make Money Online?

You need traffic to generate revenue. I think that’s a pretty obvious statement. If nobody is visiting your website or blog, how do you expect them to buy anything from you? You can’t. So then the question becomes, how do you generate traffic?

This question requires a pretty comprehensive answer and I could talk to you on this topic all day. But, one of the most well-known and effective methods is content marketing. Which means writing content (articles, case studies, opinion pieces, etc) which your target audience will search for and read. The higher quantity & better quality content you have the better chances of generating traffic to your site or blog.

Content marketing is a strategic marketing approach focused on creating and distributing valuable, relevant, and consistent content to attract and retain a clearly defined audience — and, ultimately, to drive profitable customer action.

Instead of pitching your products or services, you are providing truly relevant and useful content to your prospects and customers to help them solve their issues.

A recent survey conducted by Content Marketing Institute (CMI) shows the vast majority of marketers are using content marketing. In fact, it is used by many prominent organizations in the world, including P&G, Microsoft, Cisco Systems, and John Deere. It’s also developed and executed by small businesses and one-person shops around the globe. Why? Because it works.

But, you need a platform where you will publish your content. It could be a self-hosted WordPress website or you can use publishing platforms like Medium, Quora, Linkedin, Tumblr, etc. There are many of them. Two of the most well-known and popular publishing platforms are WordPress and Medium.

In a recent study, WordPress now powers 30% of all websites in the world. That’s a staggering number. As of February 2019, Medium is in the top 200 most visited websites in the world according to Alexa.

When I set out to write this article, I wanted to compare WordPress & Medium and find out which one will help you generate the most traffic, and as a consequence, revenue. But, as it turned out, using both together is a much better strategy.

I also discovered Linkedin can be a powerful platform to publish your content and generate traffic, especially if trying to reach professionals and businesses owners. This is not at all what I expected find.

So, I decided to follow the research, dig a little deeper and reach out to bloggers and digital marketers who’ve used all 3 platforms to get their opinions.

I contacted David Alexander of Mazepress to get his 2 cents. Here’s what he had to say…

“Over the years I have found the best results come from using more than one platform. That said, there are many differences between WordPress and Medium worth being aware of.

Medium is a great platform and very easy to use, so it’s an ideal choice for those starting out who have no audience and need to build a following.

Medium has its own partner program where you can make money as a result of the number of people who read your articles but it does involve paying to sign up.

While there are many authors making a good amount of additional income from their Medium blogs, it’s rare to see a large number of people making a full income from this platform on its own.

WordPress, on the other hand, is something you can own completely and have full control over. While you have no inherent audience if you are willing to put in the work and open up different traffic sources like Medium, social media and using SEO strategies the ceiling is a lot higher and you can monetize in lots of different ways that are either difficult or impossible with Medium.

I have found the best results come from having a WordPress website or blog at the top of your pyramid and then using platforms like Medium to republish content several months after it has been published to expose your content to a wider audience with the hope that traffic will trickle through to your owned media (your own website on WordPress).

With your own WordPress site you can drive people to your email list, include sponsored ads, affiliate offers and build your own eCommerce store on the back, all of these things aren’t so easy if all you have is a Medium blog.

Medium is a platform like any other social media site and being overly reliant on one source of traffic and revenue leaves you in a difficult position if they decide to change their business model or even shut down.”

David is a digital marketer and ‘web guy’ with over a decade under his belt helping SME’s & individuals to use technology not only to survive but to thrive in the new digital ecosystem. He also documents his experiments, failures and interesting tools at Mazepress. You can find David on Twitter @mazepresscom.

I also reached out to Brandon Ballweg of ComposeClick who also uses Medium to syndicate his content for additional exposure. Here’s what he had to say..

“In my opinion, hands down the best option between these two is WordPress, and by that, I mean the self-hosted WordPress.org version. This means that you own your own domain and you install WordPress to it through your hosting provider. 

Given that you own everything on your site if you set it up with WordPress, you get to do whatever you want with it and monetize it in ways that aren’t available on Medium. Some examples include display ads, affiliate marketing where you review and recommend products, sell your own products/course, and many more. 

The only way I use Medium is by syndicating content, meaning cross-publishing on your own site’s blog and on Medium for additional exposure – which can bring more people to your site and build your brand.”

Brandon is the founder & editor of photography education website ComposeClick.

Case Study: Which platform generates the most traffic

An interesting case study conducted by Rich Tucker demonstrates how combing your own blog (using WordPress) along with Medium and Linkedin will generate more views of your content. Here’s what he concluded from his study…

When starting out with a new blog, the extended reach from Medium and Linkedin makes the time spent writing more valuable. It is easy to re-publish content on Medium and Linkedin.

In his study, Rich wanted to test publishing the same article on Linkedin vs Medium vs his own WordPress blog RichTucker.co to see if there are more benefits to republishing content on either Linkedin or Medium.

He published it on his blog first, then on Linkedin and a week later on Medium. The only change he made on the 3 posts, were slight modification in titles to help them all potentially rank for different long tail Google Searches.

4 weeks after the original post, here were the stats:

RichTucker.io WordPress Blog:
193 views

Linkedin:
1,257 views

Medium:
877 views

Linkedin and Medium both gave the article extended reach based on the engagement.

Linkedin got off to a stronger start than Medium, but Medium’s daily views didn’t slow down right away. Rich predicts Medium will surpass Linkedin in a couple of months.

You can read Rich’s full case study on Medium – Test Results: Publishing on Medium vs Linkedin vs Personal Blog

Rich Tucker is director of Enventys Partners, an integrated product development, crowdfunding and marketing agency in Charlotte, NC. You can find him on Twitter @RichTucker.

Advantage of Medium & Linkedin Over WordPress

Both Medium and Linkedin provide valuable data to writers that you do not get from a personal WordPress blog.

Medium shows the number people who viewed the post as well as how many of those people actually read it.

Linkedin shows the employers and job titles of the readers. This is pretty cool data that you can only get from posting articles on Linkedin.

Conclusion

I think it’s quite clear from my research you shouldn’t limit yourself to only one platform to publish your content. The consensus seems to be that WordPress offers the most flexibility & freedom in how you to generate revenue, but, it needs to be combined with other well-known platforms like Medium & Linkedin to help drive traffic (not to exclude other platforms like Quora or Tumblr).

If you’ve had success with either of these platforms and are willing to share your experiences, we’d love to hear about it in the comments.


Top 3 WordPress Contact Form Plugins Compared

Top 5 WordPress Contact Form Plugins Compared

With any WordPress website, one of the most important components is the call to action. How are people going to contact you? The answer is with a contact form.

Since there’s many contact form plugins available in the WordPress Plugins directory; we decided to pick the top 5 and compare them. An overview and analysis of each will give you a better idea to which WordPress contact form plugin you should use for your site.

Contact Form 7

Contact Form 7

With over 5 million active installations, Contact Form 7 is the most popular and oldest WordPress contact form plugin in the WordPress plugin directory. It’s a free plugin that can manage multiple contact forms that can be customized to your liking.

The form supports important features such as Ajax-powered submitting, CAPTCHA, and Akismet spam filtering. You can also consider installing third-party add-ons to enhance Contact Form 7 to customize the styles and improve functionality.

The form itself is great for anyone that wants a straight forward contact form that can be added quickly. The only downside is the lack of support since it’s a free plugin, however, there are many online resources available. It’s also not very customizable in terms of design, so you may want to consider other plugins if you’re looking for anything fancy.

Another downside is that Contact Form 7 is only good for creating the most basic looking contact form. If you want to do more, like integrate email or payment, then it might not be the best option for you.

Contact Form by WPForms

Contact Form by WPForms – Drag & Drop Form Builder for WordPress

WPForms created a user-friendly contact form that can be built without any coding knowledge required. It has over a million active installations, making it the next most popular WordPress contact form plugin. With WPForms, you can crease gorgeous contact forms with the drag and drop WordPress form builder. This is a great option for beginners!

The form boasts a long list of features, such as CAPTCHA and Honeypot method to stop spam, smart conditional logic to show or hide fields based on user behavior, and more! It can also be easily integrated with third-parties, such as PayPal, Stripe, and MailChimp with the upgraded version.

If designing isn’t your forte, then you can select from one of their pre-built form templates to customize. Best of all, it’s free to install! For additional support and features, you can upgrade to the pro version. However, I’d say that it already comes with a significant amount of features that are extremely customizable and versatile for any WordPress site.

HappyForms

Contact Form to Manage and respond to conversations with customers — HappyForms

HappyForms is another drag and form builder that can create contact forms, lead generation forms, feedback forms, quote forms, survey forms, and more! With over 10,000 active installations, it’s another great choice for beginners.

Features include live preview as you create them, one-click HoneyPot and Google ReCaptcha spam prevention, and more! It’s a free plugin with an option to upgrade for extended functionalities, such as password protect forms, form date/time scheduler, and advanced filtering of responses.

Though it’s not as popular as the other two options, it still has a five-star rating in the WordPress plugin directory. It’s a great WordPress contact form plugin to consider for your website.

Form Maker

Form Maker by 10Web – Mobile-Friendly Drag & Drop Contact Form Builder

Yet another convenient, yet powerful drag and drop WordPress contact form plugin, Form Marker’s intuitive interface allows you to create contact forms in a matter of minutes. It has over 100,000 active installations, making it another popular choice to consider.

This free WordPress contact form plugin has beautiful themes for you to pick and customize from. They include protection against spam, conditional logic, and a selection of 43 different field types to choose from! With the upgraded version, you’ll have access to payment integration, file upload, and more!

Our favorite thing about Form Maker is the customer support. They have a low response time and always resolve issues within 24 hours, making a great option for those that want the extra confidence.

Formidable Forms

Contact Forms, Surveys & Quiz Forms Plugin by Formidable Forms Builder for WordPress

With over 200,000 active installations, Formidable Forms is a WordPress contact form plugin that claims to offer the “first-ever” solutions-focused plugin on the market. Their drag and drop form builder can create contact forms, surveys, quiz forms, registration forms, and more!

Formidable Forms is one of the most advanced WordPress contact form plugins in the market. It gives you full customization and ability to create any kind of forms—not just contact forms. The benefit of utilizing Formidable Forms include the vast amount of functionality without having to install third-party tools. It has a built-in form styler to instantly customize the look and feel of your form, along with survey features to create surveys and reports.

This free all-in-one WordPress contact form plugin is great for advanced users that want the additional features. With the premium version, it includes features such as email subscription forms, file upload, and payment integration.

Since this plugin is more complex, we wouldn’t recommend it for beginners.

Which One is Best for You?

This greatly depends on what you’re looking to use the WordPress contact form plugin for. All of the plugins mentioned have high ratings and thousands of active installations.

It will also depend greatly on your experience with WordPress plugins and coding. If you’re a beginner, then you will probably lean towards a drag and drop option. If you’re more advanced, then one with vast amounts of features might be more suitable for you.

Another one to consider is mobile functionality. All of these WordPress contact form plugins are functional with mobile, but you should still test how each one looks on your website.

We recommend you to try each one to get a taste of what will work best for you. There are no risks with each one and the only way to find the perfect WordPress contact form plugin is to play around with them!

Error Establishing a Database Connection Error Message

How to fix Error Establishing a Database Connection in WordPress

You wake up one morning and attempt to log into your website only to discover it’s displaying a white page and an error message: Error Establishing a Database Connection.

Which usually looks something like this,

Error Establishing a Database Connection Error Message

Error Establishing a Database Connection Error Message

If you’re running an e-commerce site or generating leads for your business or professional career, this can be worrying as your loosing out on sales. So ideally you want to fix this issue ASAP.

I’ve encountered this problem many, many times over the years and 99% of the time I was able to resolve it quite quickly. So don’t panic. Keep reading this tutorial to learn practical tips on how to fix the error establishing a database connection in WordPress.

What does it mean?

First, let’s examine what this error message actually means. In short, you are getting this error because WordPress is unable to connect to the MYSQL database where all the data for your website is stored.

Your database uses a language called MySQL. Your website is reliant on a server-side language called PHP. Whenever your website URL is entered into the browser, WordPress uses PHP to retrieve all the information pertaining to the page from the database and sends it to the visitor’s browser.

The error establishing a database connection you tend to experience is because this MySQL-PHP connection is severed for some reason.

How to Fix Error Establishing a Database Connection in WordPress

Image by CloudWays.com Managed Cloud Hosting Platform

Why are you getting this error?

In my experience, this error usually occurs for the following reasons;

  • Your database login credentials are wrong or have been changed
  • Your database server is unresponsive
  • Your database has been corrupted
  • Your website may be experiencing a heavy traffic spike, which is beyond your server’s capacity

Video Troubleshooting Tutorial

Always backup your site

Before we start troubleshooting the error, it’s important you generate a backup of your site. This will ensure that if something goes horribly wrong, at least you have a backup you can revert to. In your web hosting admin panel (cPanel) do the following:

  1. Open the File Manager and compress all your website files (this will generate a zip file and will serve as your backup).
  2. Open PHPMyAdmin and export the MySQL database through the Export function.

Now that you’ve backed up your site, we’re ready to start troubleshooting.

Narrow down the problem

We need to determine if your MYSQL database has been corrupted. If you receive the same “Error Establishing a Database Connection” message when you access your admin panel (http://www.yourwebsite.com/wp-admin/); your database has not been corrupted and you can proceed to the next step in this tutorial.

However, if you receive the following error message:

One or more database tables are unavailable. The database may need to be repaired

Then your MYSQL database has been corrupted and it must be repaired. WordPress has a built in feature that allows you to do this easily.

In the root WordPress file directory, locate the wp-config.php file. Use an FTP client or the File Manager within your web hosting panel (cPanel).

Open the wp-config.php file and add the following line at the bottom of the file:

define('WP_ALLOW_REPAIR', true);

Now navigate to:

www.yourwebsite.com/wp-admin/maint/repair.php

(Replace “yourwebsite.com” with your actual URL)

You should see a page like this.

WordPress Repair Database Feature

Image credited to CloudWays.com Managed Cloud Hosting Platform

You now have 2 options. If you’re not in a hurry I recommend selecting the 2nd option: Repair and Optimize Database. This option takes a little longer but it offers a more comprehensive attempt to fix your corrupted database.

Immediately after the repair and optimization process has completed, remove the line of code you added to the wp-config.php file. This repair page can be accessed without the need to log in, so it creates a security issue.

Verify the MYSQL database name and password are correct

As I mentioned at the beginning of this tutorial one of the most common reasons for this error is an incorrect database name or password which prevents your site’s PHP files from connecting with the MYSQL database.

These settings are found in your sites wp-config.php file in the root directory and contains the following four variables,

  • database name
  • database username
  • database password
  • database host

It will look like this,

/** The name of the database for WordPress */
define( 'DB_NAME', 'database_name_here' );

/** MySQL database username */
define( 'DB_USER', 'username_here' );

/** MySQL database password */
define( 'DB_PASSWORD', 'password_here' );

/** MySQL hostname */
define( 'DB_HOST', 'localhost' );

Note down these values since you will need to verify them later on.

NOTE: Your DB_HOST value may not be localhost. Depending on your web host, it could be different. For popular web hosts like HostGator, BlueHost or SiteGround, it is localhost. Your localhost value is usually visible within your web hosting panel. If not, you can always contact your web host and ask them to provide it to you.

cPanel Manage MYSQL Databases

cPanel Manage MYSQL Databases

Next, log into your web hosting account panel (cPanel) and locate the section entitled Databases and click on MySQL Databases.

In the Current Databases section you will find a list of all your existing databases. Locate the name of the database you noted down previously.

Verify a user has been assigned to it and that it matches the DB_USER value you noted earlier from the wp-config.php file.

cPanel MYSQL Databases Management

cPanel MYSQL Databases Management

If those values don’t match then you have found the reason for the error and you will need to copy and paste the correct values into the wp-config.php file.

Unfortunately, web hosts generally don’t display passwords for database users in the web hosting panel for security reasons. So, you’ll need to generate a new password and enter it in the DB_PASSWORD field of the wp-config.php file.

Scroll down to the section entitled Current Users and locate the correct user for your database. Click on Change Password to generate a new secure password.

Navigate to Current Users section and click Change Password

Navigate to Current Users section and click Change Password


Generate a new password for the database user

Generate a new password for the database user

Once you’ve ensured the wp-config.php file contains the correct values for the database name, database user and password, save the file.

Now you can check if the issue has been solved by visiting the front-end of your website (http://www.yourwebsite.com) or by logging into your Admin Dashboard.

Check if your MYSQL database server is unresponsive

Sometimes the error could be due to an issue with the server itself and not your site files or configuration. In order to test and see if your MYSQL databaser server is unresponsive, try creating a new database in your web hosting panel.

Check if your databaser server is running by trying to create a new database

Check if your database server is running by trying to create a new database

If you’re unable to create a new database or it seems to be taking too long, then there’s most likely an issue with the database server itself.

In that case, contact your web hosts technical support department to request assistance.

Check if your server is overcapacity

That is a nice problem to have. It could mean you’re experiencing a huge traffic spike. Someone may have shared your site on social media or a high traffic blog or online newspaper has linked to your website.

In short, it means your server has reached maximum capacity or can’t keep up with the extremely high demand. To check if you’re experiencing a sudden traffic spike you can check your sites analytics software (Google Analytics).

Check your analytics software for a sudden traffic spike

Check your analytics software for a sudden traffic spike

You’ll see a huge spike and a drop-off, indicating your site stopped reporting the traffic because your server is down. The only way to get your site up and running again is to contact your web hosting company to upgrade your hosting plan. Most web hosting companies provide 24/7 customer support and are usually good in providing quick turn-around for upgrades.

But how can you prevent this from happening in the first place? What kind of measures can you implement to make sure your site doesn’t crash when a traffic spike hits? The answer is to get a better hosting plan but not everyone is willing to pay extra in the event your website “may” or “may not” go viral at some point. A good alternative is to use a Content Delivery Network (CDN) like Cloud Flare. Here’s an article explaining what you should do if you’re expecting a huge traffic spike.

So, hopefully you’ve found this article helpful and were able to resolve the issue. If you have any questions or comments use the comment form below and one of our moderators will be glad to respond.


css.php

Error: Please enter a valid email address

Error: Invalid email

Error: Please enter your first name

Error: Please enter your last name

Error: Please enter a username

Error: Please enter a password

Error: Please confirm your password

Error: Password and password confirmation do not match