Physical Address
304 North Cardinal St.
Dorchester Center, MA 02124
Physical Address
304 North Cardinal St.
Dorchester Center, MA 02124
Tech News, Advice and Tutorials
Tech News, Advice and Tutorials

Spam registrations or comments can be a nightmare. However, you can stop them completely using CAPTCHA.
According to Wikipedia, CAPTCHA, or Completely Automated Public Turing test to tell Computers and Humans Apart, is a type of challenge-response test used in computing to determine whether or not a user is human.
In this article, we’re going to cover how to add CAPTCHA to your WordPress site using the Google Captcha (reCAPTCHA) plugin.
To install the Google Captcha (reCAPTCHA) plugin, login to your WordPress Admin Dashboard and navigate to Plugins » Add New.
Use the search form to locate the plugin and click Install Now. Use the following search term: google captcha.

If you prefer you can download the plugin from the WordPress.org Plugins directory and install it manually by clicking Upload Plugin. Then, click or drag the plugin’s zip file to the Choose File box and hit Install Now.
Once the plugin is installed you need to activate it.
To do this, go to Plugins » Installed Plugins and locate the Google Captcha plugin. Click Activate.
You can add CAPTCHA to any part of your WordPress site you think might be vulnerable to bots.
For example, as well as the registration or login page, it can also be added to contact and comment forms.
Adding CAPTCHA to these sections of your site couldn’t be easier with the reCAPTCHA plugin.
In your Admin Dashboard navigate to Google Captcha » Settings to configure the plugin.
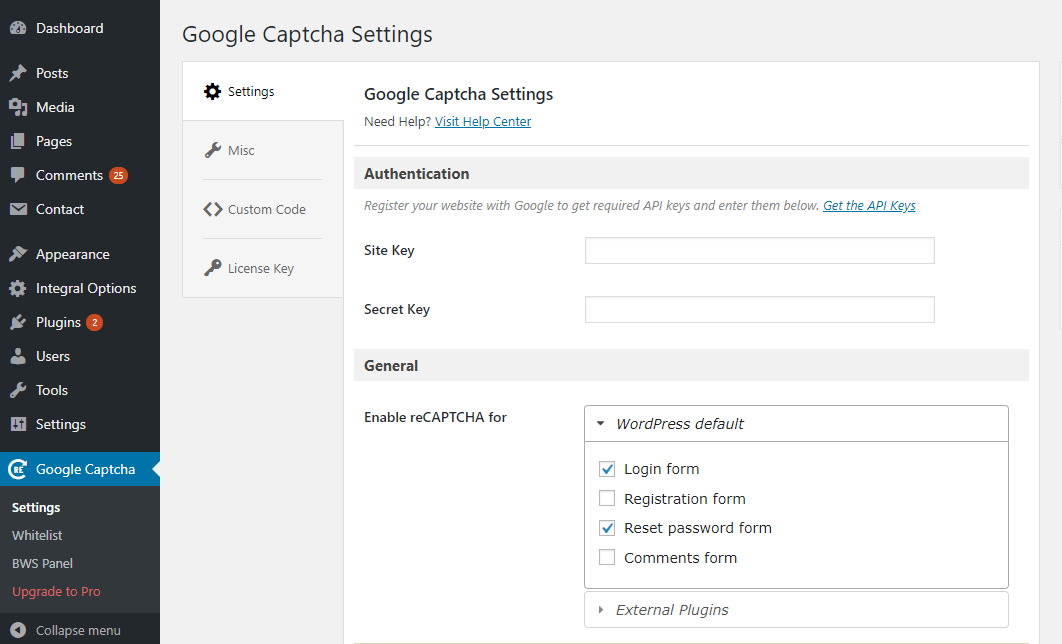
In order to get the API keys to authorize reCAPTCHA on your site, you first need to register your website with Google.
Under the Authentication section, click Get the API Keys to be redirected to Google.

Sign in to your Google Account. If you don’t have an account, register one.
Once you’re logged in you’ll see a section entitled Register a new site.

Now you need to choose the type of reCAPTCHA you want to use.
Once you’ve decided on the type of CAPTCHA, add the domain(s) you want to add the reCAPTCHA to (your website or blog).
Accept the Terms of Service and then hit Register.
Note: You can also use the Label field if you’re using different reCAPTCHA settings on different pages, but it’s not obligatory.
Scroll down to the section entitled Adding reCAPTCHA to your site.
This is where your Google-generated API keys are, as well as the instructions on how to apply them to your site.

Copy the Site key and paste it into the Site key box in Google Captcha » Settings of your WordPress Admin Dashboard.
Do the same with the Secret key and hit Save Changes.

Now it’s time to test it out.
As soon as you’ve copied your API keys in WordPress, Test reCAPTCHA will show up underneath them. To test it, just click the button.
Your chosen CAPTCHA type (eg. v2) will show up. Complete the test and a confirmation message will appear once it’s successful: The verification is successfully completed.
reCAPTCHA is now installed on your site.
Now you need to chose where you want reCAPTCHA to appear on your site.
In Google Captcha » Settings, under the General section you’ll see Enable reCAPTCHA for and then a list of checkboxes.
This is how you decide where the CAPTCHA forms will appear on your site.

Check all the boxes and save your changes.
If you want to add a CAPTCHA to contact forms, you’ll need an external plugin, which is a premium feature. However, it’s quite affordable at $30 /year.
Now that you’ve successfully installed reCAPTCHA on your site, a CAPTCHA field will appear beneath each form and prompt users before completing the form submission.
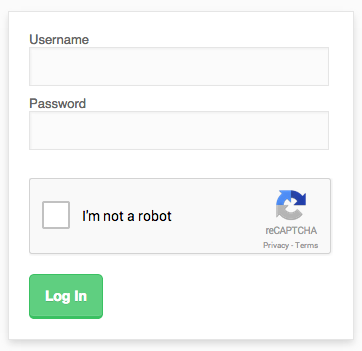
That’s it, now spam bots will be unable to bypass the CAPTCHA field of your site and won’t be able to flood your site with spam.
I hope you’ve found this tutorial useful, if you have any questions or comments please use the form below.
